Monday, February 24, 2014

USB Audio Class 2.0, Windows and Computer HiFi

One of the reasons we never completed a commercial product was because we didn't have a very good interface between our hardware and the software player. I'm going to explain this in really simple terms, because I don't really want to get into all the technical details.

A device driver, in this case an audio driver, is the software that controls the audio hardware attached to your computer. Our DAC/amp will not function without a driver. The prototype we built long ago, relied on a FireWire driver for operation, meaning our hardware connects to a PC using a FireWire connection. It has a "FireWorks" circuit board, designed by Echo Digital Audio, that supports 8 channels of audio at 24-bit and 192 KHz (the FireWorks can handle many more channels, but we only use 8). Echo uses this board in the AudioFire FireWire audio interfaces they sell to audio engineers. Recording studios use audio editing software like Avid's Pro Tools, Yamaha's Steinberg Cubase, Sony's Vegas/Sound Forge and Roland's Cakewalk Sonar with Echo's FireWire audio interface hardware to provide multiple connections for microphones and musical instruments to record and edit audio. Echo created custom drivers for working in Windows. The audio editing software usually works with Echo's ASIO drivers to get the best performance and Echo also provides a standard WDM (Windows Device Manager) driver so their hardware will also work as a basic soundcard in Windows.

Our product was designed for listening to stereo and multichannel surround sound (I've written several posts explaining how to rip and play multichannel surround audio from DVD-Audio, SACD and Blu-ray discs), not as a recording and mastering device for pro-audio. Unfortunately, Echo's FireWire WDM driver didn't work with popular Windows programs for playing surround, like Windows Media Player or Windows Media Center. If you configured your PC to use Echo's WDM driver, you would get 4 stereo channels instead of an 8-channel device. So we contracted with Echo to update their driver to support an 8-channel WDM device. For those of you using Echo's AudioFire devices with your PCs for listening to surround music or movies, you can thank us for paying for the development of the multichannel driver. Our contract didn't say anything about exclusive use, so now all of Echo's customers benefit from these updated multichannel drivers. You can now choose between stereo mode (which will provide the 4 stereo pairs) or multichannel mode (for an 8-channel setup). Now Windows Media Center can use any FireWorks based product as a multichannel device and you can listen to full surround when you watch TV or play movies and surround audio recordings.

If you were to purchase a device like ours, after connecting it to your PC (via FireWire), you'd have to install the custom driver before you could listen to surround recordings. It wouldn't be plug and play. And, if you get a new operating system, like Windows 8.1, you may need to download an update to remain compatible. So we'd have to continue paying Echo to make sure our device was supported in the case of bug fixes or updates for new operating systems. Also, back when we started this project, FireWire ports were included on most PC motherboards. That's not the case anymore, especially with the smaller form factor PCs that have great potential as HTPCs. Every PC and motherboard has multiple USB ports. So if we were to develop a commercial product, we'd switch to a USB interface and we wouldn't want to depend on a custom or proprietary driver that you'd need to install and keep up to date. Ideally, we'd want an audio device that'd work with drivers that are native to the operating system.

Here's the problem, at least for Windows (including Windows 7 and Windows 8/8.1). All popular operating systems (Windows, Mac OS X and Linux) support USB Audio Class 1.0 natively. Only Mac OS X and Linux support USB Audio Class 2.0 natively. We wanted to sell our product to Windows users because that's where the best apps are for playing high resolution, surround audio and video files. USB Audio Class 1.0 was the standard developed back in 1998 and because of its limited bandwidth only supports 2 channel audio. USB Audio Class 2.0, which became a standard in 2009, has plenty of bandwidth to support multichannel audio. Since Microsoft doesn't have a native USB Audio Class 2.0 driver for Windows, you'd need a proprietary 3rd party driver. We can't afford the licensing fees and we don't want our users to deal with the hassles of installing and maintaining drivers.

Microsoft's Frank Yerrace, who's part of the Windows sound team, asked the WDM driver development community (wdmaudiodev) several years ago why they would want USB Audio 2.0 in Windows. Many responded that they would like USB Audio 2.0 because of support for higher sample rates, bit depth and channel counts.

I agree with David Hoatson, an engineer from Lynx Studio Technology, a manufacturer of pro audio interfaces, who responded:
"now that there are more USB Audio 2.0 solutions coming to market, each company is having to develop its own driver and of course each will have varying degrees of success. Audio driver development is generally not the core competence for a chip-set company so they end up having a 3rd party company develop the driver. OEMs end up with the "not our fault" situation where the chip-set company blames the driver company and the driver company isn't being paid to fix bugs. The end result is products that don't work very well on Windows, but work better on OS X."
David went on to say that he thought the key issue is market acceptance:
"Microsoft never supported audio on FireWire in the OS, and I would say there are fewer FireWire audio devices on the market as a result. If Microsoft supports USB Audio 2.0 in Windows, I think you will see many USB Audio 2.0 devices hit the market." 
A later response from David spoke more to the marketing issues when he wrote:
"I understand the need to convince the upper-level management to get on-board with developing something new. Our VP of Marketing is famous for pushing his "Faster, Cheaper, Better" phrase. I think the phrase applies very well in this instance. Right now the choices for anything more than 16-bit/48kHz are VERY limited. This certainly limits the ability to create a product that will work well with Windows. USB Audio 2.0 does it faster and better, but at the moment it certainly isn't cheaper. If most of the responses were from the pro side, I think that is because we are the people that care about higher quality audio the most... and trickle down does work. Satisfy the top end client and the lower end will thrive filling the low-price-point void.  In other-words, if Microsoft makes the price of entry to the market less expensive to develop, you will see the consumer price-point fill with products.  ("If you build it, they will come"). Besides, do they really want Apple to beat them with USB Audio 2.0? :-)"
Bernt Ronningsbakk, with the Norwegian software company that develops 'Audiolense', responded to Frank Yerrace's post:
"Our customers are basically consumers who are conscious about sound quality. The standard USB implementation is not good for audio. The limitations are not simply about channel count, bit depth and driver problems. It is also about the protocol used to transmit the data. It is basically a S/PDIF-equivalent protocol where the clock on the transmitter (the computer) puts a signature on the sound. S/PDIF is an inferior protocol to begin with. Add to that some added challenges with USB and it stands out as the worst alternative. Some of the jitter out of the PC will manifest itself in the analog waveform regardless of how the receiver side works. A couple of consumer/prosumer manufacturers have developed USB interfaces with asynchronous audio transmission. I don't know the details, but I assume it is equivalent to block processing or callback based buffer filling where the clock in the DAC is the only one that matters. USB has the potential to provide bit perfect transmission. As it is today, a high quality non-USB sound card is required for top quality audio rendering. USB sound cards with multichannel/bit depth capability that reflects the new waveformextensible standards with regards to channel count and bit depth would be a huge selling point to the masses. Callback-based audio streaming would be an added bonus that would bring USB into the picture also amongst those who pay whatever it takes to get the best possible sound quality. Computer based hifi has so much going for it, and a good USB audio solution would lower the threshold of entry significantly."
Like I said, that discussion was several years ago. I think it was around the time Windows 7 was first released and I was very disappointed that Microsoft didn't include native support for USB Audio Class 2.0. We didn't hear anything back from Microsoft or Frank Yerrace. Well actually, Frank did respond to thank everyone for their feedback, but he didn't offer any words of encouragement that would indicate Microsoft was moving toward developing a USB Audio Class 2.0 driver. Following this discussion there were a few people speculating that Microsoft doesn't think there's enough demand to justify the investment needed to develop a driver. Perhaps they are right. I've read a few other forum threads on the same topic and I haven't come across any comments that sound promising. A person (Petter103) who supposedly has close ties to Microsoft offered:
"It would cost Microsoft $50K to have a third party develop this for them (OK let's quadruple that, it is still inexpensive and enabling for consumer scenarios). Until recently, however, Microsoft has not been all that concerned with consumers. It has always been much more important to add 1000 group policy objects per year ..." and, "I have had deep contacts with Microsoft on this very topic for about 8 years now - was pushing very hard for a number of years including walking into program managers and developers offices unannounced. The sad story is that their USB Audio developer who actually contributed to the UAC2 standard quit the company, no idea what is going on now other than hearing through the grapevine that no UAC2 support is forthcoming for Windows 8. My history with Microsoft on this suggests that this will not be a feature of Windows 8, so if it is of interest to you, get yourself a third party driver (not even sure how to do that as a consumer without also buying hardware) with the benefits and caveats that implies, or switch to a platform that offers it. It is sad that this is so, because lack of driver causes fragmentation of driver model (a big third party driver vendor makes the audio driver a non-audio device ....) which in the longer term causes more problems for consumers."
Now that Windows 8 has shipped with no USB Audio Class 2.0 driver, it looks like Petter103 was correct. However, Windows 8 hasn't been very successful and they've had to deal with lots of media reports about its supposed big failures. The market is different now. Not only are Macs more popular than a few years ago, but now Microsoft has to compete with iPads and Android tablets. Windows 8 was suppose to tie together the smartphone, tablet and PC platforms, which you'd think would help keep loyal customers from switching, but that doesn't seem to be working. Maybe Microsoft will pay more attention to their home consumers (not just their corporate customers) and offer better audio capabilities. I was pleasantly surprised to see a new post dated 2/13/2014 from Frank Yerrace on the wdmaudiodev listserv saying:
"I had asked this list several years ago about the level of interest in USB Audio 2 and reasons for the interest. I received some private responses as well as responses to this public list. Even though in-box support ultimately was not included in Windows 8, those responses were greatly appreciated and very helpful. As you can imagine, we are constantly evaluating where to invest for future versions of Windows. I assume the interest in in-box USB Audio 2 support is still quite high. If interest has further increased or perhaps decreased for any reason, please don't hesitate to speak out." 
First to respond was Kevin Halverson, CTO of High Resolution Technologies, LLC., a manufacturer of high quality DACs for consumers. Kevin wrote:
"USB Audio Class 2.0 support is important for a number of reasons. First, the ability to run High Speed USB is becoming a more important issue as the number of new platforms shipped with USB controllers and root hubs which properly support Full Speed USB devices properly diminishes on a nearly daily basis. Second, USB Audio Class 1.0 precludes higher sample rate, high channel count audio which for many companies like ours, means that we have to provide our own USB Audio Class 2.0 drivers. Third, the amount of maintenance necessary to keep custom drivers patched and working well across many different versions of Windows is a considerable challenge. The final point is, we constantly hear from customers that are looking to other host platforms running other operating systems just in order to get native USB Audio Class 2.0 support (and hence why we went to the time and expense of developing our own). While support of Audio Class 1.0 is important to support legacy hardware, it is fairly absurd that all these years later Microsoft still hasn't done what nearly every other operating system supplier has in terms of keeping current with audio requirements. Certainly if a small company such as ours can accomplish this, the task should be rather trivial for an industry powerhouse such as Microsoft."
Again, in this thread there are responses that, depending on your point of view, are pessimistic or realistic. Tim Roberts, a consultant with Providenza & Boekelheide, Inc. and Microsoft Partner, was quick to argue:
"There has to be a business case to justify the considerable development and testing expense. Standards are only interesting if they are used. If USB Audio 2 is a niche standard that is only interesting to a tiny fraction of the market (and the current evidence suggests that is the case), then it doesn't make sense to develop a class driver. To four decimal places, Audio Class 1.0 satisfies 100% of the Windows users in the world." 
To which Timothy Knudtson, a Software Engineer with iConnectivity, replied:
"Where does this number come from? In the audio industry things are moving towards using USB Audio 2.0. USB Audio 1 may work for 100% of the Windows users because for those users who want USB Audio 2.0 they are simply switching to Mac." 
Tim responded:
"The problem is sheer volume. There are a billion Windows machines in the world.  How many really need to use USB Audio 2 devices right now? Maybe 1,000? Maybe 10,000?  999,990,000 out of a billion is 100%, to four significant digits. That's the problem Microsoft faces. They need to make sure all of the corporate secretaries in the world can listen to Michael Bolton through iTunes. 16-channel 192 kHz audio is cool, but there just isn't widespread business demand for it yet."
Jerry Evans, who I believe is a developer with Instrumental Innovations, replied:
"Lack of standards compliance from Microsoft is a barrier for vendors and dissuades consumers from purchasing ‘unsupported’ hardware. Build it and they will come. WASAPI has enabled us to push this project forward. I’m not convinced anyone could have made a business case for its provision. But eventually it arrived, and was quickly supported by all the major DAW’s. Surely a much, much tougher nut to crack than a relatively mundane driver … "
And Philip Gruebele added:
"I think that the lack of standards support is not a strategy that Microsoft can continue pursuing in today's competitive market. It is doing the same thing as the lack of Bluetooth Low Energy support under Windows Phone. The competition (aka Apple & Google) is simply leaving Microsoft behind in this regard."
I thought this response to Frank was very interesting. Børge Strand-Bergesen, who's a hardware guy working on an open source DAC project (Audio Widget Project), had this to say:
"We have an open source Windows UAC2 ASIO driver. Ideally, we'd have a Windows UAC2 driver like the one on Mac and Linux. But since we don't, what I wish to do next is gather enough force to make a fully fledged UAC2 driver and release it under GPL. One centrally distributed device driver with the potential of supporting all UAC2 hardware. The 30-60 demographic has a lot of users who still prefer a PC over a tablet, and who love their music. My doctor is the perfect fit. He loves classical music. After trying a couple different DACs he's ended up with quite the driver collection and resulting DLL version inconsistencies. Now he's in the market for a Mac to play his music, even though he has no other use for one. I have watched the HiEnd audio scene and built DACs for some years now. People borrow and test each other's DACs the whole time. The lack of native UAC2 drivers on Windows is the single largest inhibitor of growth for high resolution audio. Having to install a driver scares away a large chunk of today's customer base, and it prevents that customer base from growing. DLL conflicts and crappy user interfaces push even more users into the Mac camp, where things work out of the box. Getting the promised sample rate in real life is important. Kbps sells just like megapixels. The hardware brand owners also have to struggle with the costly licensing terms of commercial drivers. Those are actually among the largest inhibitors of growth among those who supply to the early adopter users in the DAC market. The demand for UAC2 support on Win7 and onwards does not yet come from Logitech and Sony. It comes from the little guy like me who sells a couple hundred DACs to early adopters. Satisfy those, and HiFi brands like NAD and Rotel will start selling to larger groups. Satisfy those, and the Logitechs will follow. UAC2 support can easily be made a winning sales pitch for Windows PCs. 
In response to Børge, Kevin Halverson, said:
"An open source driver is an interesting idea, but native Windows support for both USB Audio Class 1.0 and 2.0 devices would be infinitely better. While we ship nowhere near the numbers of products as a Logitech and Sony, we do ship +50k units annually and a disproportionate percentage are to Mac and Linux users than one would expect based upon market share of these two platforms. I find it hard to believe that Microsoft's vast resources would even notice the trivial effort necessary to provide a USB Audio Class 2.0 driver (host stack), our small engineering staff accomplished our own in a matter of a few months and that included a lot of research and coming up to speed on what would be well known internally at Microsoft. I really wonder how this could even be something that would have to be considered for more than a moment, it just shouldn't be much of a task. Well, if nothing else. Its getting discussed again."
Here's another person with a good response to Frank's query, from Chris Barker: 
"I've been a lurker on this thread for a while. I'm not actively involved in the industry, but I am an audiophile and been dealing with PC (e.g. Windows) audio for decades. If there is a need to further prove the audience size for improved high bitrate audio support built in Windows, one only has to contact the guys at LH Labs and their very successful Kickstarter and Indiegoo Geek DAC projects. Anything that can improve and make Windows more "plug'n play" and "it just works"  for high quality audio devices would be a good thing for the world in general and users (and thus Microsoft by better perception) in particular. Also check out your favorite consumer audio magazine like Stereophile and The Absolute Sound. Each month's cover always features computer audio articles and now DSD in particular. Many of the writers who are very analog and not computer savvy revert to Mac machines because of the perceived easier experience in getting these systems working. Microsoft should be concerned at this example of quality and ease of use gap."
To counter Chris's enthusiasm, Tim Roberts, the devil's advocate of the group, responded:
"It is really hard to talk about topics like this in an objective and business-oriented way, because the whole arena is filled with so much astrology and incense and pyramids. Physiologically, 384kHz audio is just dumb, as is 192kHz and 96kHz. Anything more than 48kHz is just wasted bits. Sure, a few people are willing to spend money for that kind of equipment -- those are the same people keep telling themselves that tube amplifiers are better. They are buying Macs because Macs are cooler. I'm just not sure that a company like Microsoft can ever have mindshare in that population. Even if they released a USB Audio 2 driver stack tomorrow, I don't think it would be trusted."
So Marc Lindahl of Bowery Engineering, responded:
"Wow, clearly not a pro audio guy. While there is ongoing debate in the professional audio community and the audiophile community regarding 176.4KHz and up, there is little anymore that there is great utility for 96K and 88.2K in addition to generally superior sound quality to 44.1K/48K. The market shows there is a demand for high sample rates and bit depths, Microsoft should be interested in that. It's not 'just a few people'. Windows continues to enjoy popularity among audio pros for running various DAW software, and audiophiles as well.  The market is there."
And Børge wrote:
"I'm sorry Tim, but this is like saying Canon should've stopped adding megapixels once their cameras got 4 or so of them. kHz is a simple number. Comparing the kHz of your audio system will be done in the consumer crowds just like they compared the MHz of their CPUs and the megapixels of their cameras. The more you have of that simple metric, the better they will feel. And at the moment, Microsoft is the audio equivalent of a 3 megapixels camera or a Pentium 4 computer."
 To which Tim replied:
"No, this is not a valid comparison. Our eyes can tell the difference between 300 dpi and 600 dpi, and a 4 MP camera can only do about 200 dpi when printed at 8.5x11. Those extra pixels ARE being put to use. The same is simply not true of audio. You don't "zoom in" on an audio track. The concept doesn't make sense. The best human ears are physically unable to sense frequencies above about 20 kHz. Per Nyquist, anything above twice that frequency serves no purpose at all. They CANNOT, physically, alter what we sense in the sound. That's voodoo, not engineering.  Those MHz and megapixels are being used. Those extra kHz are utterly pointless.  Unlike the other two, we have reached a physical limit."
 Philip Gruebele replied to Tim by writing:
"Three points worth making:
  1. Whether or not it is technically necessary to support higher sample rates is not relevant. What is relevant is whether the market demands it, and it undeniably does. Otherwise why would so many companies - hardware manufacturers and download services - invest so many resources to make it happen?
  2. Using Nyquist and human hearing to make a case for not supporting higher sample rates is looking at the issue too narrowly. The reason higher sample rates can be better are complex and include things like simplifying DAC design and out-of-band filtering. Also some protocols like DSD64 over DoP require 176.4Khz and DSD128 requires double that just to get the data across. UA2.0 also supports certain use cases which are not possible with UA1.0. The minimum sample rate that should be supported is at least 384Khz and UA2.0 has handled all these cases for many years.
  3. The lack of USB Audio 2.0 support causes a headache for consumers because they have to deal with low quality, poorly tested, third party drivers. These drivers are not going away because of point (1). There are a LOT of high-end audio enthusiasts who voted against Windows by using Apple products because they provide a better end-user experience."
There were a few followup responses that went into technical details about the advantages of USB Audio Class 2.0 ver Class 1.0, but what you read above covers the main debate. The last posting was about a week ago on 2/16/2014. I hope these responses to Frank's inquiry will have some effect at Microsoft and convince them to develop a native USB Audio Class 2.0 driver for a future version of Windows. Time will tell. If I hear anything, I'll keep you posted.

Friday, February 14, 2014

Playing and Ripping Blu-rays with your PC

After finally posting my SACD ripping article, I decided to do a quick follow-up and describe my method for ripping and playing Blu-rays with my PC. I've been using the same method for a fairly long time and haven't bothered to learn if there is a new method that might be better. Again, leave a comment if you know a better method.

First, I'm going to address the issue of Blu-ray playback using my PC. Back in the end of 2008 I posted an article about problems I had playing Blu-rays with my PC. I had trouble because my hardware didn't comply with the software Blu-ray player's DRM technology. Programs like Cyberlink's PowerDVD and ArcSoft's TotalMedia Theater check if your hardware has a protected audio path (PAP) and if not, will decrease the audio bit depth and sample rate to 16 bits and 48kHz. My setup, which doesn't have a "protected path," is capable of 24-bit/192 kHz playback, so I was/am disappointed with this downgrade. Of course the purpose is to prevent piracy. The industry doesn't want to let someone capture the perfect bits and share them on the Internet, like they can with tracks from CDs (and DVDs, and with a bit of work, SACDs).

Two of our PCs connected to our home network are Blu-ray capable. Our HTPC in our family room has a BD-ROM drive and the PC in my office has a BD burner. The HTPC has my prototype audio equipment (8-channel DAC and Hypex Class-D amp modules) and it doesn't support PAP, so with ArcSoft's TMT3 the audio gets downgraded. The PC in my office has an ASUS soundcard that is PAP compliant, so TMT3 doesn't downgrade the audio there. ArcSoft has since been upgraded several generations and the current version is 6.5. I haven't bothered to upgrade because they still downgrade the audio, and I can't find any other advantage to upgrading.

We prefer to watch Blu-rays in the family room because the HTPC is hooked up to a nice 47" flat screen HDTV and the audio system is very good. The PC in my office is connected to a 24" LCD monitor and even though the audio system in my office is pretty good, it's not nearly as good as the one in our family room. After a little research (HD to mkv ....the options are endless), I figured out how to play the main movie/feature of the Blu-rays with the HTPC (family room) without downgraded audio. If I ripped the video and audio from the Blu-ray disc and put the audio into a FLAC (free lossless audio codec) container and then merged the audio and video into an MKV file, I could use other players to watch my Blu-rays. Here's the trade-off: I could no longer just insert the Blu-ray disc into my BD drive, run TMT3 and navigate the menus to watch the movies and/or extras. Now I could only play the MKV file, just like I would with any other video file on my computer. At least the audio was no longer downgraded. So, when you extract the audio and video from a Blu-ray, you can choose to get the main feature and whatever extras, but they become separate audio/video files. So you can no longer use that nice Blu-ray menu to navigate the content on your disc. I decided I could live with that for the main feature. If I wanted to watch the extras, I could simply insert the Blu-ray disc in the drive and navigate the menus. Most of the time the audio quality isn't that great in the special features anyhow.

I'll cover my ripping methods in a little more detail, later. To play the MKVs extracted from my Blu-ray discs, I can use either WMC (Windows Media Center), MPC-HC (Media Player Classic - Home Cinema) or my current favorite, JRMC (J.River Media Center). There are other programs like VLC media player that can play these MKVs, but I prefer WMC, MPC-HC or JRMC. At first it was a little tricky to get everything to work. At the time (this was several years ago), I needed the correct combination of codecs installed on computers. It all seemed pretty confusing, but by following the recommendations I found online, I finally got it to work. The main components I had to install for ripping and playing MKVs sourced from Blu-rays were a DTS decoder, which can decode the high resolution DTS-HD Master audio tracks commonly used in Blu-rays, a program that can split the audio and video tracks into separate files and another to merge them back together. Like I said, it was a little complicated at first. Thankfully, it's become a lot simpler now. One of the key components, the DTS decoder, is included with my copy of ArcSoft's TMT, so that's why it is still installed on my systems. Occasional I run TMT3 to use the menus, but most of the time, I never use it for watching the main movies. If you decide to use WMC or MPC-HC to play your MKVs, you'll need to make sure you have the right codecs and tools installed. If you use JRMC, you really don't have to worry about installing a bunch of codecs, everything you need is provided when you install JRMC. Also, when I first played MKVs from Blu-ray, I had to convert the audio tracks to FLAC if I wanted to listen with full resolution. Since then, new codecs or tools are available that let me play the original DTS-HD or Dolby True-HD audio tracks with MPC-HC or JRMC. Thanks to a German guy named nevcairiel and his LAV Filters, you can now play all the audio codecs with these other players.

The best user interface for playing our movies is WMC. And to compliment WMC, I use 'My Movies' to help manage my collection and display a very nice menu strip in WMC. 'My Movies' is also used for organizing the DVDs stored on our media server. The UI for JRMC is a close second to WMC and the MPC-HD UI is the most basic, because it doesn't have a nice menu list of our movies, like you get with WMC or JRMC (note: JRMC takes a little tweaking to get a menu list of movies, so it's a little more work than WMC). However, JRMC seems to give us better playback results. The audio and video quality are a bit better than the quality we were getting when using WMC. However, the WAF (wife acceptance factor) of WMC was higher and she didn't really notice the quality difference. There was one major annoyance that convinced my wife and kids to switch to JRMC. When you play a full resolution Blu-ray, the audio tracks have a fairly high dynamic range. There's a big difference between the quiet and loud passages. My family is very sensitive to loud noise (I'm much more tolerant) and whenever there are explosions or other loud passages, they quickly use the remote to lower the sound level. Then when the dialog is quiet, they increase the volume. It's particularly annoying when the quiet dialog is suddenly interrupted with a big explosion. So when we are watching movies, my wife is constantly adjusting the volume to find a comfortable middle ground. Now, with the latest version of JRMC (v19), they have a new DSP feature called "Adaptive Volume" that automatically adjusts playback volume. It dynamically adjusts the volume, while preserving dynamic range, so loud and quiet parts are a little closer (normalized) and you no longer need to constantly adjust the volume while watching. WMC doesn't have this type of feature.

There are several programs out there for ripping Blu-rays. I'm going to describe my two favorite methods. The first method is a little more hassle because it involves multiple steps. I'll refer to this as the manual method. The second method is much easier because you run a single application with a nice user interface and a few simple steps. Both of these methods preserve the original quality of the audio and video of the Blu-ray. There are other programs that will reduce the resolution or bitrate if you want to watch the movie on a portable device like your smartphone or tablet. The methods described here retain the highest quality.

1. Manually Ripping Blu-rays
The reason I'm going to describe the manual method is because I use it for music Blu-rays, like concert performances, when I want to create both a copy of the video performance and another copy of just the audio tracks that I can play in my music library. I'll show some screenshots, but I'm not going to cover every detail necessary to get this to work. You may need to refer to other websites for those details (I'll provide links below).

For this example, I'm going to rip my Blu-ray titled "Live at the Isle of Wight Festival 1970" by The Who. I'm using 2 main programs to rip and create my MKV file, which I will save as a concert movie. I'm also going to use a couple of other tools to extract the audio tracks as individual FLAC files. Then I can add them to my music library. In order to rip a Blu-ray disc, the program will need to decrypt the disc to get around the copy protection (BD+, AACS, and other DRM protections). If the ripping application doesn't have this capability, which is the case with the manual method I'm describing here, then you'll need to install a decrypter and have it running before you can start ripping. I'm using Slysoft's 'AnyDVD HD'. This is a commercial program that I purchased a long time ago (originally, I bought AnyDVD to decrypt my DVDs and later upgraded to the HD version for use with Blu-rays). I also needed 'AnyDVD HD' just to play copy protected discs with TMT3. With 'AnyDVD HD' installed and running, I'm ready to rip this Blu-ray concert disc.

Sometimes I'll use TMT3 to look at the Blu-ray menus. Usually, the menus for a concert disc will list the songs, but sometimes they are organized as chapters. The menus can also be used to identify the bonus features and determine if there might be additional songs or concert footage not included on the main feature. In the case of this disc, the songs are also listed in the insert and on the back of the sleeve. As you probably know, when you rip one of your CDs, the ripping program will pull down information from an online database to provide information for tagging your songs. They will use the database from Gracenote (a fee based service) or freedb (an open source free metadata service) to provide the tags for artist, album, title, genre, etc. These types of databases don't exist for Blu-rays. You'll have to provide this information manually.

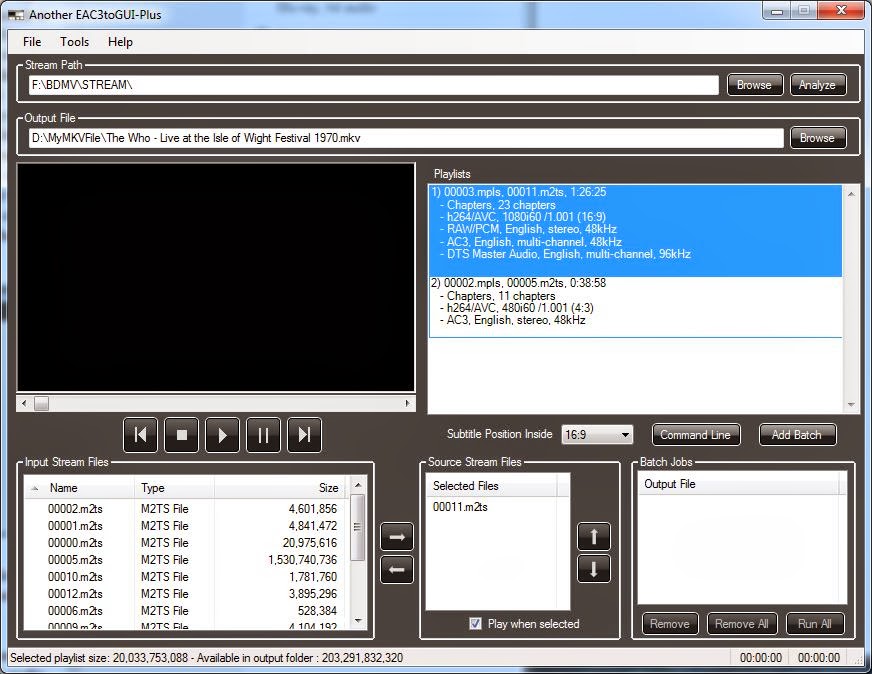
Like I mentioned earlier, the manual method is a multiple step process. The first program, eac3to.exe, will extract the audio and video into separate files. It will also save a chapter file and a subtitles file. The audio track will be losslessly converted from whatever version is on the disc to FLAC. Now, eac3to.exe is a command line utility, which isn't exactly the easiest thing to work with, so I use a program that provides a nicer user interface for eac3to.exe called 'Another EAC3toGUI'. Here's a screenshot of the interface:


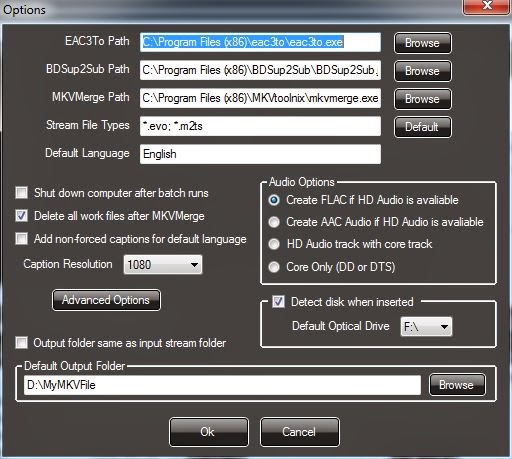
'Another EAC3toGUI' works if you have all the necessary tools that eac3to.exe uses for extracting and encoding Blu-rays. Before we begin ripping, I'm going to show how this program is setup. By picking 'Options' under the Tools menu, I can verify my settings.
In this dialog, you provide the location of all of the programs used for ripping your Blu-ray. As you can see, you need to include the path for eac3to.exe, BDSup2Sup, which is used to extract and convert the subtitles data, and MKVMerge, which is used to reassemble the audio, video, chapters and subtitle files into the final MKV. As you can see, this program doesn't provide any video options. It will extract the video, but it won't modify or re-encode it in any way. So if the video is encoded as 1080p (1920x1080 resolution) H.264/AVC, that's what you get. There are several options for the audio and depending on the disc, you may have several different audio tracks to choose from. I always choose the highest quality audio track available. Most of the times, a Blu-ray will have a surround audio track losslessly encoded with DTS-HD MA or Dolby TrueHD. If that's the case, this program will convert these tracks to lossless FLAC. There will be no loss of quality going from one lossless format to another lossless format. Sometimes, a Blu-ray will not include a lossless audio track and instead uses a lossy format like DTS or Dolby AC3. If that's the case, 'Another EAC3toGUI' will just save the audio as is without encoding to FLAC.

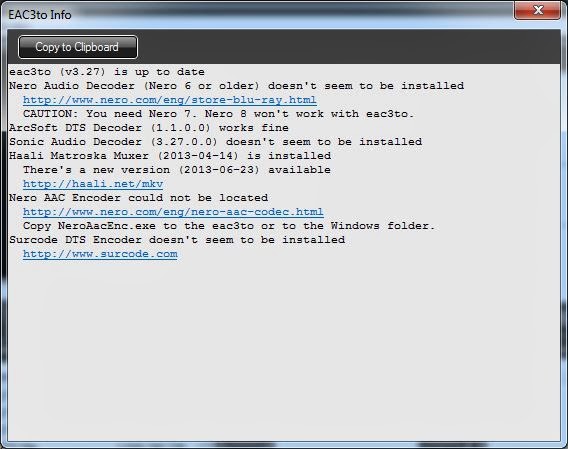
I believe eac3to is short for "encode 'ac3' to". AC3 is the lossy audio encoding format developed by Dolby Laboratories and is commonly used in DVDs. It is also referred to as "Dolby Digital." This tool has been around for a long time and can now handle all of the Dolby format's including their lossless TrueHD format used with many Blu-rays. However, eac3to.exe cannot decode the other popular lossy audio encoding format, DTS (also used on DVDs) and their very popular lossless format DTS-HD MA (used on Blu-rays). That's why I still have ArcSoft's TMT3 still installed. It handles the decoding of the DTS formats. If you pick 'EACto info...' under the Tools menu, you can see if you have the required codecs. I use this program only for ripping Blu-rays, so I don't use some of the other codecs on this list. For Blu-rays, I'm using 'ArcSoft DTS Decoder (1.1.0.0) and for splitting out the audio, video, subtitles and chapters, I use 'Haali Matroska Muxer'.

Now I'm ready to rip. 'Another EAC3toGUI' can rip the main feature from your Blu-ray disc and create an MKV file with the original video merged with the new FLAC encoded audio. You end up with a high quality audio/video file of your movie or concert. However, since I want both the concert video performance and the audio tracks, I'm not going to let 'Another EAC3toGUI' merge everything back together. Instead, I'm going to use the "Command Line" feature to generate the separate components. Looking at the main screen again, you can see that the 'Stream Path' shows the location of the Blu-ray source. In this case, it's my Blu-ray drive (F:) and it automatically found the titles in the STREAM folder. As you can see, it found 2 titles or playlists.

You can usually identify the main feature by the duration. Playlist 1 has a duration of 1:26:25 and playlist 2's duration is 0:38:58. On the back of the Blu-ray's sleeve, it says the running time is approximately 134 minutes. This running time is almost always for the main feature, but it doesn't seem to apply in this case. They must be referring to the total cumulative duration of the concert and all the bonus features. For this example, I've picked playlist 1 because it is the longest. Playlist 1 also has more high resolution audio tracks to choose from including the stereo RAW/PCM and multi-channel DTS-HD MA.

I've also entered the path and default filename for the output files under the 'Output File' section.The source audio/video streams are listed under the 'Source Stream Files' section. When you pick one of the streams (in this case only one stream is listed), it will automatically start playing in the preview window if you have "Play when selected" checked. You can preview the stream to also make sure you're picking the correct title or playlist.
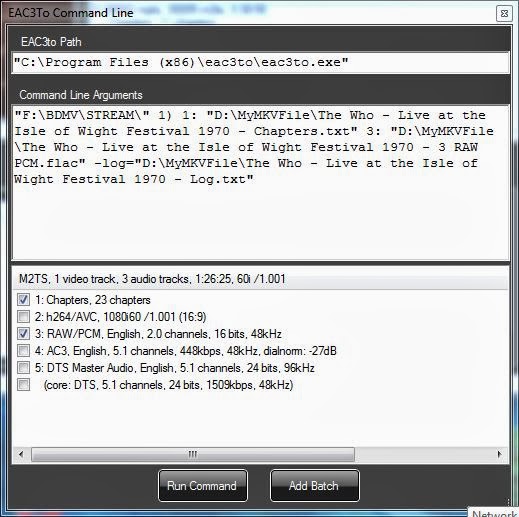
To start the ripping process, I pick the 'Command Line' button. First, it analyzes the playlist and displays another window. The top section shows the commands that will run 'eac3to.exe' from a command line and the bottom section is a list of options that you can apply to 'eac3to.exe'.
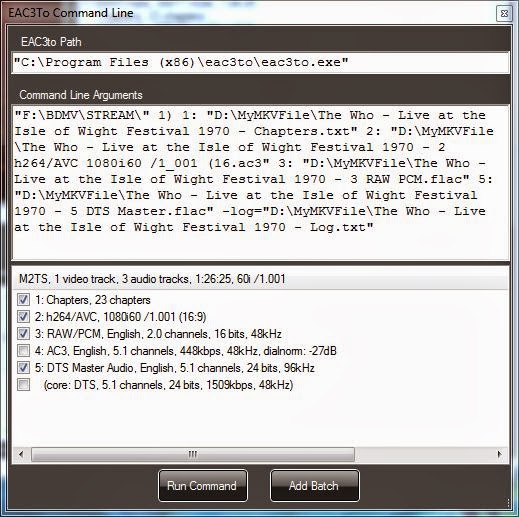
As you can see, it has created an 'eac3to.exe' command with arguments for extracting the chapters and the RAW/PCM audio tracks. This Blu-ray doesn't include subtitles, so that isn't listed. There are a bunch of components that 'Another EAC3toGUI' didn't pick, including the h264/AVC video track and the DTS Master multi-channel audio track. Normally, it chooses the highest quality audio and video tracks by default. For some strange reason, 'Another EAC3toGUI' doesn't like interlaced video. As you can see above, the video track is listed as 1080i60. The "i" means it is interlaced. The highest quality audio track is the least compressed format and in this case that's the uncompressed RAW/PCM. Actually, since the DTS Master Audio is lossless, its quality is the same as the uncompressed PCM, but that's the choice this program makes by default. I would like both, so I'm going to pick the checkbox for '5: DTS Master Audio, English, 5.1 channels, 24 bits, 96kHz'. I also want the video track, so I'll pick '2: h264/AVC, 1080i60/1.001 (16:9). Since I don't want any of the other components, I'll leave them unchecked. Before picking the 'Run Command' button, I can review the 'eac3to.exe' command arguments. Normally, I'd just run the command, but I know from experience that the current settings won't work.
The command line part after 2: doesn't make any sense to 'eac3to.exe'  and it will just make the program end in error. For some reason it seems to misinterpret the "(16:9)" part and it changes it to "(16.ac3", so I've edited it to an argument that will work. I've simply deleted everything past 1080i60 and replaced with ".mkv", which will put this video track into a temporary MKV container.

Now, I'm ready, so I can pick "Run Command." This will activate a command window and you can see 'eac3to.exe' do its job.
The resulting four files (a chapter file, the video file, a stereo PCM audio file, which will be converted to stereo FLAC, and a multichannel FLAC audio file from the DTS Master Audio track) will be stored in the folder I've chosen for the output. In this case, that's a folder I've named "MyMKVFile."
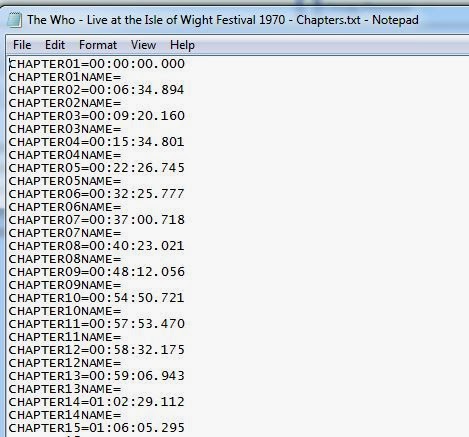
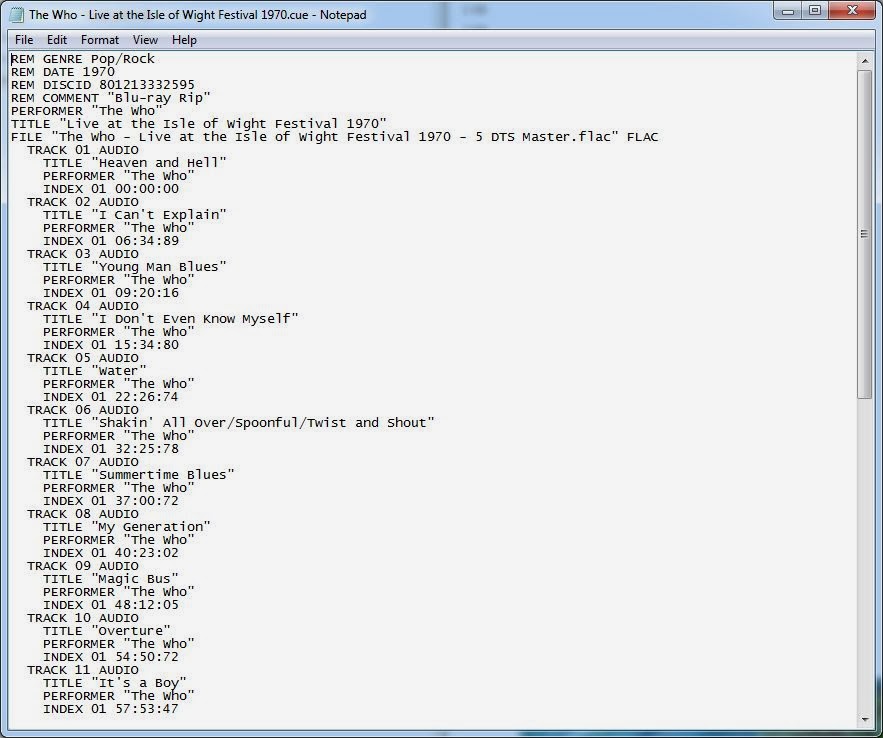
I have everything I need to create the concert video MKV and surround sound and stereo albums for my music library. First, I'm going to generate the audio albums. The FLAC files I have are audio of the whole concert. I would like to split them into individual tracks for each song. To accomplish this, I'm going to create a CUE file, which I can use to split the audio into separate files. A CUE file, is a metadata file which describes how the tracks of a CD are laid out and are stored as plain text files and commonly have a ".cue" filename extension. All I need is the start time information in the chapter file and the song titles listed on the back of the Blu-ray's sleeve. The number of chapters in the chapter file match the number of songs listed on the sleeve. Here's a snippet of the chapter file. To create the CUE file, I use a template, with the basic format, instead of starting from scratch. Here's a portion of my edited CUE file:
I've used the times from the chapter file for the start times of each track. The format for time is a little different in the chapter file and the CUE file. The chapter file uses HH:MM:SS.xxx and the CUE file use MM:SS:xx (where xx or xxx is fractions of the second). So for a chapter that starts at 01:06:05.295, I wrote 66:05:29 for the track start in the CUE file. You can test your CUE file with any program that can read them. I usually use foobar2000 because it's quick and easy. After right clicking the CUE and picking 'Open with foobar2000' I can see if it worked and I can test each track to verify that I've got the right times and track titles.

Using foobar's convert tool, I'm going to generate individual tracks from the big FLAC file identified in my CUE file. I have the convert utility set to convert to FLAC, so basically all it will do is create the 23 individual tracks. You can also accomplish this with other programs like JRMC. Once I've generated all my tracks for the FLAC file that was originally multichannel DTS-HD MA, I can repeat this process for the stereo RAW/PCM tracks. All I have to do is edit the CUE file and change the designated file so it uses the RAW PCM file instead of the DTS Master file.
I now have the individual audio tracks, both stereo and surround, and I can move them to my media server and import them into my JRMC music library. This Blu-ray also included some bonus material. I can use 'Another EAC3to GUI' to select the 2nd playlist where these bonus tracks were stored and then run through this process again.

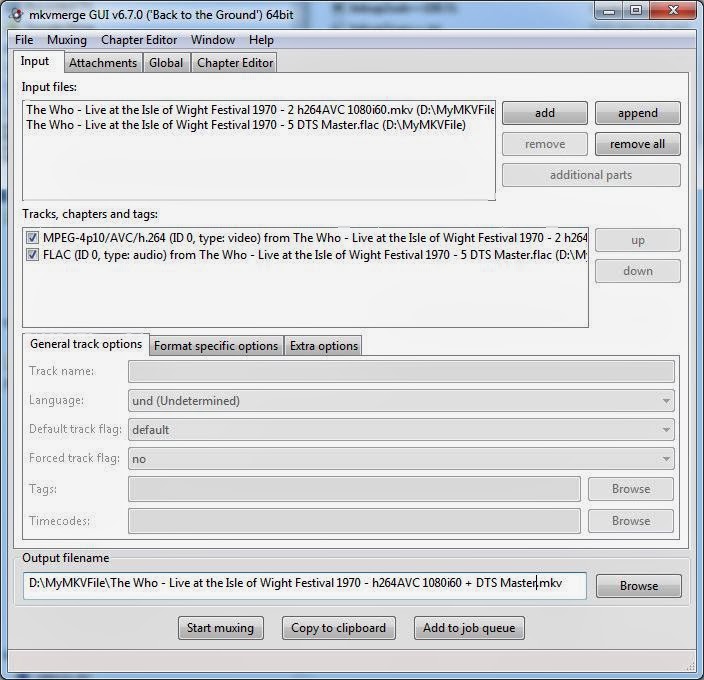
Now that I have my audio albums, I can create my concert movie. The original full length audio tracks are still intact because foobar2000 did not delete the original files when it generated the files for each songs. So this brings us to the second part of the manual ripping method. I need to merge everything together into a concert movie, so I have a single MKV file of the audio and video. For this, I am using a program called 'mkvmerge GUI'. MKVmerge is the program 'Another AEC3to' uses to merge everything together during it's automated process. I am using a version of this with a nice graphical user interface (GUI). MKVmerge is part of MKVToolNix, which is a set of utilities for MKV files.
I've picked the 'add' button to add my audio and video files to the 'Input files' list. Using Windows Explorer you can also drag and drop these files into the 'Input files' section. As you can see above, I'm only including the multichannel FLAC file that was originally DTS-HD MA, but I could include the stereo PCM audio if I wanted both audio tracks. I don't, so I've only added the multichannel track. Next, I'm going to add the chapter file, so I can navigate from song to song (chapters) when I play the MKV with the software players on my computer. To do this, I've selected the 'Global' tab and browsed to and selected the chapter that was created with 'Another EAC3toGUI'. Before selecting the chapter file, I edited it using notepad and added the names of the songs to each chapter. The 'mkvmerge GUI' program also has a utility for editing your chapter names. Sometimes I use it to double check that I've got everything correct. To check your chapter titles, select the 'Chapter Editor' tab and drag and drop your chapter.txt file into the editor window.
I could have used this editor instead of notepad, but I think notepad's a little faster.
I can now merge everything into a single MKV file now that I've got the audio, video and chapter files selected and the output filename set to the location and desired name. Now I just pick the 'Start muxing' button and wait for it to finish.

It will take about 30 minutes to generate my merged MKV file. When it's finished, I can move this file to my media server and use 'My Movies', JRMC and/or WMC to add it to my movie library.

Here are the links to the programs I've used during the manual method:
Another EAC3toGUI-Plus info. This info page includes links to all the other utilities 'Another EAC3toGUI' needs to work. This site may also provide more details than I have in this article. It should cover features that I haven't used here. Mike Eby, the author of 'AnotherEAC3toGUI, also provides a link to a user guide written by a guy named Damien called "MKV Mania: Another EAC3to GUI." Damien also provides links to everything you need.
MKVToolNix is the set of tools you'll need to work with MKV files, including 'MKVmerge GUI'.


2. Automated Blu-ray Ripping
Now for the easy method...

Buy MakeMKV. And NO, I don't work for them. Actually, I think they have a trial period, so you can test it before you spend any money. I think the trial is fully functioning. This is the program I use for ripping my Blu-rays most of the time. In the case of concert Blu-rays, I may use the manual method described above to get my audio tracks and then use MakeMKV to extract and create my concert movie.

MakeMKV works out of the box, you don't need to download a bunch of other utilities to get it to work. You don't even need a disc decrypter like 'AnyDVD HD'. In fact, if you have it running, MakeMKV will suggest disabling it before proceeding.

For this example, I'm going to rip the disc from my "Sherlock Holmes - A Game of Shadows" Blu-ray. After inserting the disc in my BD drive, I've launched MakeMKV:
First, I make sure it is set to my BD drive and then I pick the Blu-ray icon near the middle of the screen. The program analyzes the disc and displays a list of all the titles.
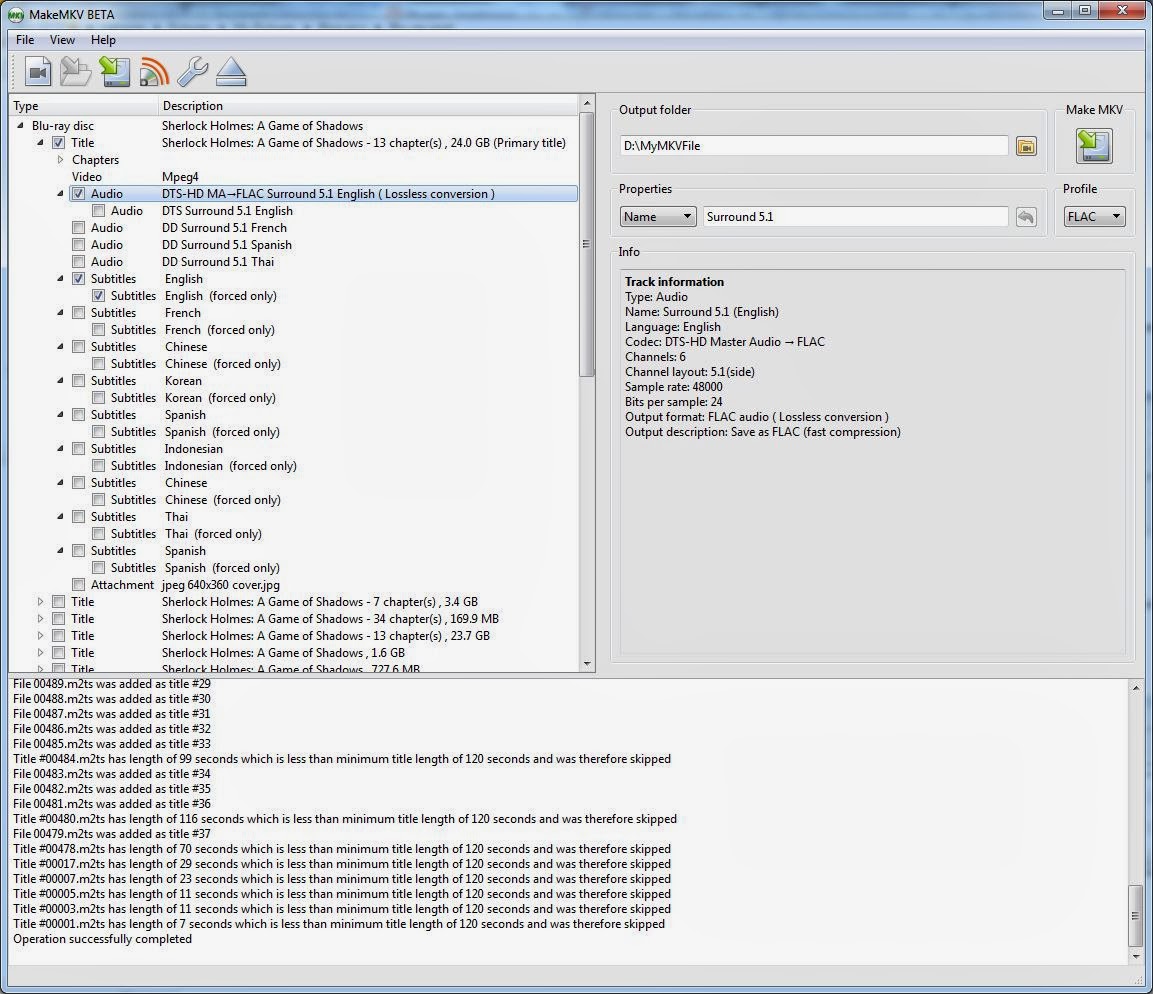
The results show there are quite a few titles. Normally, with most movies, it's pretty obvious which title is the main feature. It's usually the largest sized title. With TV series discs, it's not quite as easy. Unfortunately, MakeMKV doesn't have any way to preview these titles. In this case one of the titles is identified as the main feature (that's not necessarily the case with all Blu-rays), so I'm going to deselect the other titles since I only want to create one MKV movie file. I've clicked on the little triangular icon to expand the tree. This will show all the components included with the titles, such as the audio tracks and subtitles.
I've removed the checkbox from everything except the high resolution DTS-HD MA track and the English subtitles. I've selected both the English subtitles and the English forced subtitles. By checking the 'forced only' branch, it will only included the forced subtitles. Normally I don't want all the subtitles of an English movie. However, some English movies will have foreign dialog, like the movie "Argo," and with forced only checked I will get subtitles when they are speaking Farsi. You can also see that the DTS-HD MA track is going to be converted to FLAC. That's because I'm using the FLAC profile. If I change the profile to 'Default' it will not convert the DTS-HD MA track and both the audio and video will be in their original formats. Once all my programs, JRMC, MPC-HC and WMC were capable of using the LAV filters, I've been able to play the original DTS-HD MA tracks.  So I really don't need to use the FLAC profile. Next, I'm going to pick the 'Make MKV' button to rip and generate my MKV movie.
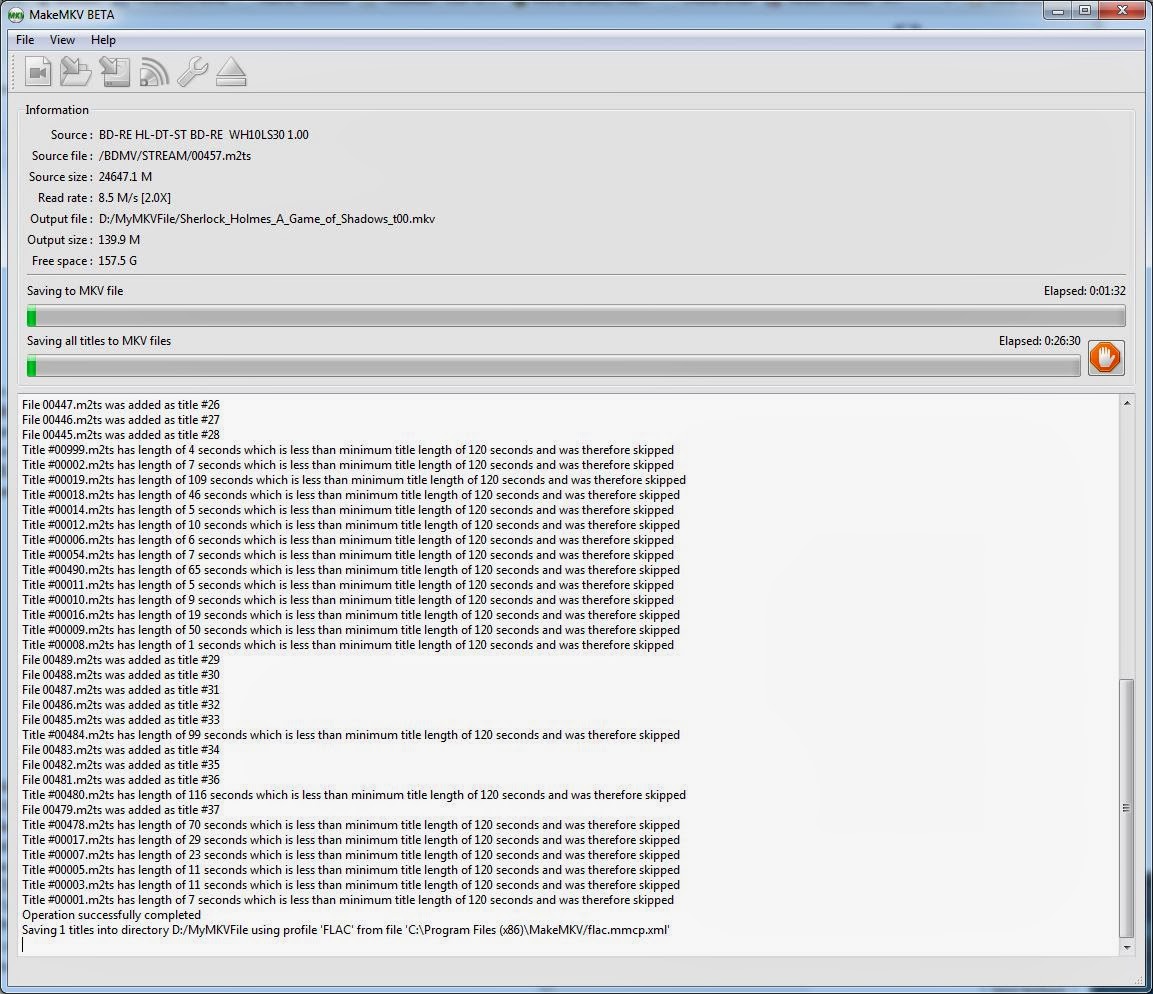
That's it! After about 30 or 45 minutes, I'll have my MKV file and I can move it to my server and add it to my movie library. As you can see, that's a much simpler method than the manual method described above. However, you can't extract just the audio by itself. MakeMKV will only create a complete A/V movie file. You could open the resulting MKV file with 'MKVExtractGUI2', which is one of the tools included with MKVToolNix. Then you could extract the audio and chapter files, and follow the steps in the manual method above for creating the cue file and splitting out the tracks.

Tuesday, February 11, 2014

Playing and Ripping SACDs with your PC

Note: I started writing this post back in August of 2012. I just never got around to publishing it at the time. I start by providing a little background information and end with what I think is the latest and best method. However, I haven't checked for newer versions or methods for well over a year, so there might be better methods out there. Please leave a comment if you know if there's a better method.

I've wanted to rip and play SACDs with my computer for a long time. Since I didn't own a dedicated SACD or even universal CD/DVD/SACD player, I hadn't been able to play a SACD disc until recently. As far as I know, the sound quality from a SACD is very similar to DVD-Audio, but there seems to be a lot more content available on SACD, so the ability to play the tracks from a SACD disc became one of my goals. Since I store my music on my media server and stream it via several PCs attached to my home network, I prefer to rip all my content off the discs. I don't want to purchase another piece of hardware and add to the chain of equipment to play another format. Maybe this is another sign that I'm getting old. When I was a teen, I thought having a rack of hardware with lots of flashing LEDs was pretty cool, not so much now. Besides, I think more components added to a very good audio system can compromise the overall sound quality.

A few years ago (I don't know the exact time frame or dates) some very technically savvy people started working on ripping SACDs. Unlike ripping normal DVDs and CDs, this seemed impossible. You couldn't purchase a SACD drive for your PC and even though it turns out a SACD drive is really a DVD drive with different firmware that allows it to read the DSD data format, you couldn't just replace the DVD's firmware to make it work with SACDs. The best you could do was record the analog audio output from a SACD player into your computer using a soundcard with analog inputs. With a high quality professional soundcard or audio interface, you could get pretty good results. So someone with a multichannel device with decent ADCs (analog-to-digital converter) could connect the analog inputs of their multichannel interface to the analog outputs of their SACD player. The resulting 24-bit/96KHz or higher resolution tracks sounded pretty good. In my opinion, these were a step above a meticulously ripped vinyl recording. However, they still needed an analog-to-digital conversion step. And depending on your SACD player, they might already have gone through another conversion step from DSD to PCM. If they used a mediocre SACD player, the results were not so great, so you also needed a pretty high end player.

Maybe I should back up a bit and try to explain the difference between DSD and PCM. Forget it... that's not important here. If you want to know more about this, just read the Wikipedia article. This article also includes links to Sony technical documents and other FAQs.

Even though the analog rips of the SACD were pretty good, these technically savvy folks continued working on ways to digitally rip their SACDs. Their goal was to generate a track without going through the analog-to-digital step. Sometime around the middle to end of 2009, a person with the pseudonym "HiResOrNothing" explained how they developed their new "standard" for SACD ripping:

"We can now capture a pure 24-bit PCM digital signal which is converted directly from the pure DSD stream from the disc - and this is achieved by using a special "modified" SACD player. These modified players have been around ever since the SACD format has, but they have always been extremely expensive (like, try a $2000 Denon player which you have to order from Switzerland). But things have progressed and a few companies are offering a modified version of the famous Oppo DV-980H player, which is well known for its affordability yet uncompromised quality - especially with regards to digital SACD output!"
"I have purchased such a player. The Oppo offers pure DSD output over HDMI 1.2 and  it also gives the option for PCM output. The Oppo internally converts the DSD to PCM at 24-bit/88.2kHz and the "mod" captures this PCM signal and outputs it through three stereo S/PDIF (coaxial) jacks. To capture this glorious digital signal, I am using three M-Audio Delta 1010LT sound cards simultaneously. They each have a single stereo coaxial input, so in order to record all six channels simultaneously, three cards must be used. I'm using Adobe Audition 1.5 in multitrack mode to simultaneously record the 6 channels in real time, then I map the channels with Audition's "multichannel encoder", and export the individual mono wav channels. After that I split the album into the tracks and encode it to MLP with surcode, and author it to DVD-A with Discwelder Chrome. No editing of the audio signal is made in Adobe Audition, this is a straight digital capture of the signal and as close as you can get to copying a SACD disc-to-disc at the present time."
So if you come across a SACD rip and find it offered as 24-bit/96KHz tracks, there's a good chance it's an analog rip. If you find 24-bit/88.2KHz tracks, it's probably a digital rip. Maybe some of the commercial high resolution download sites, like HDTracks, are using a similar digital rip technique for some of their 24-bit/88.2KHz offerings. I think I've seen some 88.2KHz tracks there.

The next goal was to figure out a way to rip and play back the DSD format files. This would be the ideal method for listening to your SACD generated files on your computer or home network. However, to get the full benefits, you'd need a DSD capable DAC and a software player that can handle the DSD format. Most DACs (and as mentioned earlier in this post, many universal/SACD players), mine included, that say they are DSD capable actually convert the DSD to PCM internally before outputting the analog signal. Some, like the ESS Sabre32 DACs, I believe can convert to analog without the intermediate PCM step. When you listen to one of these DACs, you're listening to the DSD format. I personally don't have very much experience with this because I don't have a ESS Sabre32 DAC, so I don't know how different the pure DSD sounds compared to the sound of PCM after converted from DSD. Here's a post with an opinion on this subject. Fortunately, my favorite software player, J.River Media Center, can handle the DSD format, so I'm all set there.

Moving forward, early 2012, someone finally figured out how to rip and save the DSD formated file from a SACD and published "Ted's SACD Ripping (and PCM Conversion - optional) Primer - Version 2.0.4." I think the latest version of this primer is 2.3.2, but I can't find it anywhere. Maybe ask Ted, whoever he is. This method describes basically a two step process. First, you use a Sony PS3 to save a disc copy of the SACD to an ISO file. Second, after copying the ISO file to your computer, you use a program to extract the DSD from the ISO and save each track as DSF files.

The first part only works with a Sony PS3 that can play SACD discs. Before you can do anything, the firmware has to be hacked to support ripping. This will only work if the PS3 player has the firmware 3.55 or older. Apparently, there are only 4 PS3 models with this capability. If you can find one of these (good luck), then you have to hack the player. Hacking the firmware involves installing a revised version of the firmware. Once the new revised firmware is running, you can install the SACD ripping software. Once you have a hacked PS3 with the SACD ripping software installed, you can start ripping your SACD collection. Older versions of the ripping program could extract individual files or an ISO disc image. Because of slow ripping speeds and to avoid wear and tear on the PS3's optical drive, they recommend extracting the full ISO image and thus newer versions of the ripping software only supports ISO extraction. To rip a SACD disc, you use your game controller to navigate to the games section of your PS3 menu, then pick "Unknown" and then "SACD-ripper". Next, you insert your SACD into the PS3's optical drive and a USB thumb drive, with enough storage space, into one of the USB ports. After picking "OK" ("X" button), it will start ripping and eventually store the ISO file on your thumb drive. Personally, I've never done this, because I don't own a PS3 player. However, I was lucky to find a friend who owned one and was willing to run the hack. Now I buy the SACD discs and send them to him and he creates the ISO files for me. For ISO files smaller than 2 GB, he can transfer them over the Internet using a service called We Transfer. If it's larger, which it usually is, he'll burn it to a DVD-R disc and send it in the mail. I wish I could find a compatible PS3 player, but they are almost impossible to find. Maybe more will show up on eBay now that the PS4 is shipping.

The second part involves running another SACD extraction program on your PC. First, you have to install 'sacd_extract.exe' on your computer. Here are the steps I follow to extract the DSF files for each track:

  1. Copy the ISO from my thumb drive (or DVD-R) to the same folder where sacd_extract.exe is located on my PC, which I'll call the rip folder.
  2.  navigate to the rip folder and SHIFT-right click on the folder and select "open command window here."
  3. at the command prompt, type "sacd_extract" (without the quotes), followed by the arguments you want to apply to the output files. 
The command format is: sacd_extract [options] [sourcefile]. I always generate DSF files and depending on the SACD, I can generate stereo and/or multichannel surround files, if they exist. For example, I have Bob Dylan's 'Blood on the Tracks' SACD, which has both stereo and multichannel surround tracks. Assume the ISO from the PS3 rip is 'BloodontheTracks.iso'. To extract the stereo tracks, I typed:

sacd_extract -2 -s -c -i"BloodontheTracks.iso"

if I want the multichannel surround tracks, I type:

sacd_extract -m -s -c -i"BloodontheTracks.iso"

These will create a new folder named 'Bob Dylan - Blood On The Tracks' with each individual track in the format 'tracknumber - trackname.dsf' (for the first track, this would be "01 - Tangled Up in Blue.dsf"). It will create exactly the same names for both the stereo and multichannel, so if I want both, I will rename the folder to something else to avoid overwriting the stereo with the multichannel tracks. Then I move the folders to my networked server and add it to my music library using JRMC v19 (J.River Media Center). I chose DSF files because they can be tagged with metadata. So when I add them to my library, I make sure all the tags are correct.


That's it!! Now I can enjoy listening to my SACDs using my computers and my media server. Again, I don't have a DSD capable DAC, so even though JRMC19 can handle the DSF file format, it automatically converts to PCM before it is sent to my DAC. So I'm still not listening to the pure DSD format, but it still sounds really good. And when or if I ever get a DSD capable DAC, I have these in the correct format and I'll be able to listen to them without the PCM conversion.

Powered By Blogger