After finally posting
my SACD ripping article, I decided to do a quick follow-up and describe my method for ripping and playing Blu-rays with my PC. I've been using the same method for a fairly long time and haven't bothered to learn if there is a new method that might be better. Again, leave a comment if you know a better method.
First, I'm going to address the issue of Blu-ray playback using my PC. Back in the end of 2008 I posted an article about
problems I had playing Blu-rays with my PC. I had trouble because my hardware didn't comply with the software Blu-ray player's DRM technology. Programs like Cyberlink's PowerDVD and ArcSoft's TotalMedia Theater check if your hardware has a protected audio path (PAP) and if not, will decrease the audio bit depth and sample rate to 16 bits and 48kHz. My setup, which doesn't have a "protected path," is capable of 24-bit/192 kHz playback, so I was/am disappointed with this downgrade. Of course the purpose is to prevent piracy. The industry doesn't want to let someone capture the perfect bits and share them on the Internet, like they can with tracks from CDs (and DVDs, and with a bit of work, SACDs).
Two of our PCs connected to our home network are Blu-ray capable. Our HTPC in our family room has a BD-ROM drive and the PC in my office has a BD burner. The HTPC has my prototype audio equipment (8-channel DAC and Hypex Class-D amp modules) and it doesn't support PAP, so with ArcSoft's TMT3 the audio gets downgraded. The PC in my office has an ASUS soundcard that is PAP compliant, so TMT3 doesn't downgrade the audio there. ArcSoft has since been upgraded several generations and the current version is 6.5. I haven't bothered to upgrade because they still downgrade the audio, and I can't find any other advantage to upgrading.
We prefer to watch Blu-rays in the family room because the HTPC is hooked up to a nice 47" flat screen HDTV and the audio system is very good. The PC in my office is connected to a 24" LCD monitor and even though the audio system in my office is pretty good, it's not nearly as good as the one in our family room. After a little research (
HD to mkv ....the options are endless), I figured out how to play the main movie/feature of the Blu-rays with the HTPC (family room) without downgraded audio. If I ripped the video and audio from the Blu-ray disc and put the audio into a FLAC (free lossless audio codec) container and then merged the audio and video into an MKV file, I could use other players to watch my Blu-rays. Here's the trade-off: I could no longer just insert the Blu-ray disc into my BD drive, run TMT3 and navigate the menus to watch the movies and/or extras. Now I could only play the MKV file, just like I would with any other video file on my computer. At least the audio was no longer downgraded. So, when you extract the audio and video from a Blu-ray, you can choose to get the main feature and whatever extras, but they become separate audio/video files. So you can no longer use that nice Blu-ray menu to navigate the content on your disc. I decided I could live with that for the main feature. If I wanted to watch the extras, I could simply insert the Blu-ray disc in the drive and navigate the menus. Most of the time the audio quality isn't that great in the special features anyhow.
I'll cover my ripping methods in a little more detail, later. To play the MKVs extracted from my Blu-ray discs, I can use either WMC (Windows Media Center), MPC-HC (Media Player Classic - Home Cinema) or my current favorite, JRMC (J.River Media Center). There are other programs like VLC media player that can play these MKVs, but I prefer WMC, MPC-HC or JRMC. At first it was a little tricky to get everything to work. At the time (this was several years ago), I needed the correct combination of codecs installed on computers. It all seemed pretty confusing, but by following the recommendations I found online, I finally got it to work. The main components I had to install for ripping and playing MKVs sourced from Blu-rays were a DTS decoder, which can decode the high resolution DTS-HD Master audio tracks commonly used in Blu-rays, a program that can split the audio and video tracks into separate files and another to merge them back together. Like I said, it was a little complicated at first. Thankfully, it's become a lot simpler now. One of the key components, the DTS decoder, is included with my copy of ArcSoft's TMT, so that's why it is still installed on my systems. Occasional I run TMT3 to use the menus, but most of the time, I never use it for watching the main movies. If you decide to use WMC or MPC-HC to play your MKVs, you'll need to make sure you have the right codecs and tools installed. If you use JRMC, you really don't have to worry about installing a bunch of codecs, everything you need is provided when you install JRMC. Also, when I first played MKVs from Blu-ray, I had to convert the audio tracks to FLAC if I wanted to listen with full resolution. Since then, new codecs or tools are available that let me play the original DTS-HD or Dolby True-HD audio tracks with MPC-HC or JRMC. Thanks to a German guy named nevcairiel and his
LAV Filters, you can now play all the audio codecs with these other players.
The best user interface for playing our movies is WMC. And to compliment WMC, I use 'My Movies' to help manage my collection and display a very nice menu strip in WMC. 'My Movies' is also used for organizing the DVDs stored on our media server. The UI for JRMC is a close second to WMC and the MPC-HD UI is the most basic, because it doesn't have a nice menu list of our movies, like you get with WMC or JRMC (note: JRMC takes a little tweaking to get a menu list of movies, so it's a little more work than WMC). However, JRMC seems to give us better playback results. The audio and video quality are a bit better than the quality we were getting when using WMC. However, the WAF (wife acceptance factor) of WMC was higher and she didn't really notice the quality difference. There was one major annoyance that convinced my wife and kids to switch to JRMC. When you play a full resolution Blu-ray, the audio tracks have a fairly high dynamic range. There's a big difference between the quiet and loud passages. My family is very sensitive to loud noise (I'm much more tolerant) and whenever there are explosions or other loud passages, they quickly use the remote to lower the sound level. Then when the dialog is quiet, they increase the volume. It's particularly annoying when the quiet dialog is suddenly interrupted with a big explosion. So when we are watching movies, my wife is constantly adjusting the volume to find a comfortable middle ground. Now, with the latest version of JRMC (v19), they have a new DSP feature called "Adaptive Volume" that automatically adjusts playback volume. It dynamically adjusts the volume, while preserving dynamic range, so loud and quiet parts are a little closer (normalized) and you no longer need to constantly adjust the volume while watching. WMC doesn't have this type of feature.
There are several programs out there for ripping Blu-rays. I'm going to describe my two favorite methods. The first method is a little more hassle because it involves multiple steps. I'll refer to this as the manual method. The second method is much easier because you run a single application with a nice user interface and a few simple steps. Both of these methods preserve the original quality of the audio and video of the Blu-ray. There are other programs that will reduce the resolution or bitrate if you want to watch the movie on a portable device like your smartphone or tablet. The methods described here retain the highest quality.
1. Manually Ripping Blu-rays
The reason I'm going to describe the manual method is because I use it for music Blu-rays, like concert performances, when I want to create both a copy of the video performance and another copy of just the audio tracks that I can play in my music library. I'll show some screenshots, but I'm not going to cover every detail necessary to get this to work. You may need to refer to other websites for those details (I'll provide links below).
For this example, I'm going to rip my Blu-ray titled "Live at the Isle of Wight Festival 1970" by The Who. I'm using 2 main programs to rip and create my MKV file, which I will save as a concert movie. I'm also going to use a couple of other tools to extract the audio tracks as individual FLAC files. Then I can add them to my music library. In order to rip a Blu-ray disc, the program will need to decrypt the disc to get around the copy protection (BD+, AACS, and other DRM protections). If the ripping application doesn't have this capability, which is the case with the manual method I'm describing here, then you'll need to install a decrypter and have it running before you can start ripping. I'm using Slysoft's 'AnyDVD HD'. This is a commercial program that I purchased a long time ago (originally, I bought AnyDVD to decrypt my DVDs and later upgraded to the HD version for use with Blu-rays). I also needed 'AnyDVD HD' just to play copy protected discs with TMT3. With 'AnyDVD HD' installed and running, I'm ready to rip this Blu-ray concert disc.
Sometimes I'll use TMT3 to look at the Blu-ray menus. Usually, the menus for a concert disc will list the songs, but sometimes they are organized as chapters. The menus can also be used to identify the bonus features and determine if there might be additional songs or concert footage not included on the main feature. In the case of this disc, the songs are also listed in the insert and on the back of the sleeve. As you probably know, when you rip one of your CDs, the ripping program will pull down information from an online database to provide information for tagging your songs. They will use the database from Gracenote (a fee based service) or freedb (an open source free metadata service) to provide the tags for artist, album, title, genre, etc. These types of databases don't exist for Blu-rays. You'll have to provide this information manually.
Like I mentioned earlier, the manual method is a multiple step process. The first program, eac3to.exe, will extract the audio and video into separate files. It will also save a chapter file and a subtitles file. The audio track will be losslessly converted from whatever version is on the disc to FLAC. Now, eac3to.exe is a command line utility, which isn't exactly the easiest thing to work with, so I use a program that provides a nicer user interface for eac3to.exe called 'Another EAC3toGUI'. Here's a screenshot of the interface:
'Another EAC3toGUI' works if you have all the necessary tools that eac3to.exe uses for extracting and encoding Blu-rays. Before we begin ripping, I'm going to show how this program is setup. By picking 'Options' under the Tools menu, I can verify my settings.
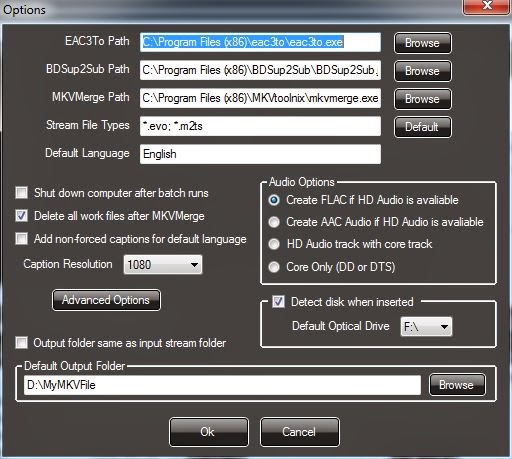
In this dialog, you provide the location of all of the programs used for ripping your Blu-ray. As you can see, you need to include the path for eac3to.exe, BDSup2Sup, which is used to extract and convert the subtitles data, and MKVMerge, which is used to reassemble the audio, video, chapters and subtitle files into the final MKV. As you can see, this program doesn't provide any video options. It will extract the video, but it won't modify or re-encode it in any way. So if the video is encoded as 1080p (1920x1080 resolution) H.264/AVC, that's what you get. There are several options for the audio and depending on the disc, you may have several different audio tracks to choose from. I always choose the highest quality audio track available. Most of the times, a Blu-ray will have a surround audio track losslessly encoded with DTS-HD MA or Dolby TrueHD. If that's the case, this program will convert these tracks to lossless FLAC. There will be no loss of quality going from one lossless format to another lossless format. Sometimes, a Blu-ray will not include a lossless audio track and instead uses a lossy format like DTS or Dolby AC3. If that's the case, 'Another EAC3toGUI' will just save the audio as is without encoding to FLAC.
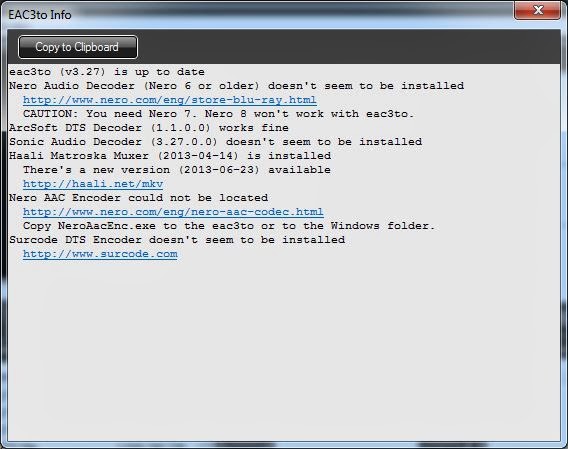
I believe eac3to is short for "encode 'ac3' to". AC3 is the lossy audio encoding format developed by Dolby Laboratories and is commonly used in DVDs. It is also referred to as "Dolby Digital." This tool has been around for a long time and can now handle all of the Dolby format's including their lossless TrueHD format used with many Blu-rays. However, eac3to.exe cannot decode the other popular lossy audio encoding format, DTS (also used on DVDs) and their very popular lossless format DTS-HD MA (used on Blu-rays). That's why I still have ArcSoft's TMT3 still installed. It handles the decoding of the DTS formats. If you pick 'EACto info...' under the Tools menu, you can see if you have the required codecs. I use this program only for ripping Blu-rays, so I don't use some of the other codecs on this list. For Blu-rays, I'm using 'ArcSoft DTS Decoder (1.1.0.0) and for splitting out the audio, video, subtitles and chapters, I use 'Haali Matroska Muxer'.
Now I'm ready to rip. 'Another EAC3toGUI' can rip the main feature from your Blu-ray disc and create an MKV file with the original video merged with the new FLAC encoded audio. You end up with a high quality audio/video file of your movie or concert. However, since I want both the concert video performance and the audio tracks, I'm not going to let 'Another EAC3toGUI' merge everything back together. Instead, I'm going to use the "Command Line" feature to generate the separate components. Looking at the main screen again, you can see that the 'Stream Path' shows the location of the Blu-ray source. In this case, it's my Blu-ray drive (F:) and it automatically found the titles in the STREAM folder. As you can see, it found 2 titles or playlists.
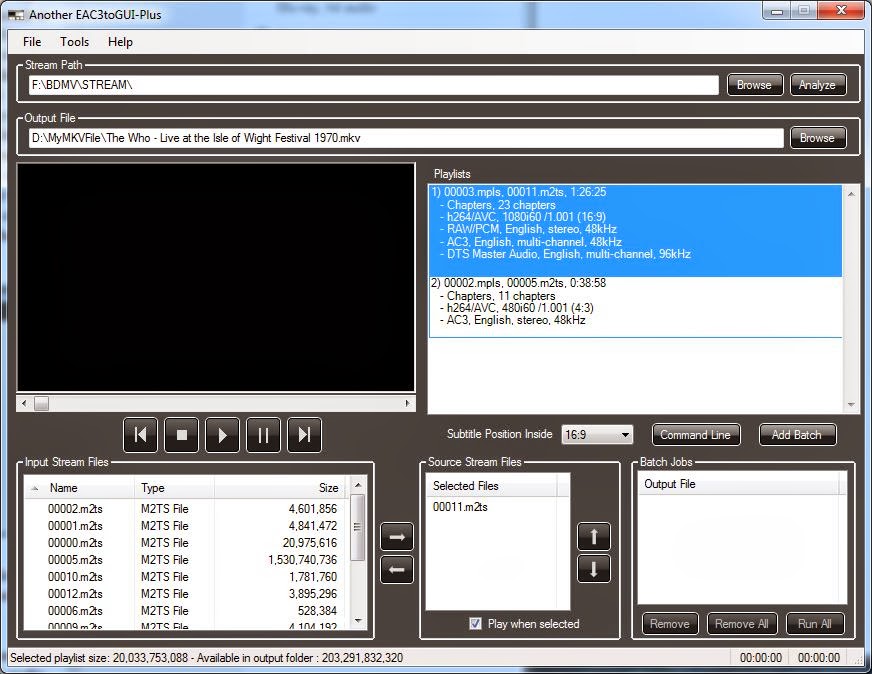
You can usually identify the main feature by the duration. Playlist 1 has a duration of 1:26:25 and playlist 2's duration is 0:38:58. On the back of the Blu-ray's sleeve, it says the running time is approximately 134 minutes. This running time is almost always for the main feature, but it doesn't seem to apply in this case. They must be referring to the total cumulative duration of the concert and all the bonus features. For this example, I've picked playlist 1 because it is the longest. Playlist 1 also has more high resolution audio tracks to choose from including the stereo RAW/PCM and multi-channel DTS-HD MA.
I've also entered the path and default filename for the output files under the 'Output File' section.The source audio/video streams are listed under the 'Source Stream Files' section. When you pick one of the streams (in this case only one stream is listed), it will automatically start playing in the preview window if you have "Play when selected" checked. You can preview the stream to also make sure you're picking the correct title or playlist.
To start the ripping process, I pick the 'Command Line' button. First, it analyzes the playlist and displays another window. The top section shows the commands that will run 'eac3to.exe' from a command line and the bottom section is a list of options that you can apply to 'eac3to.exe'.
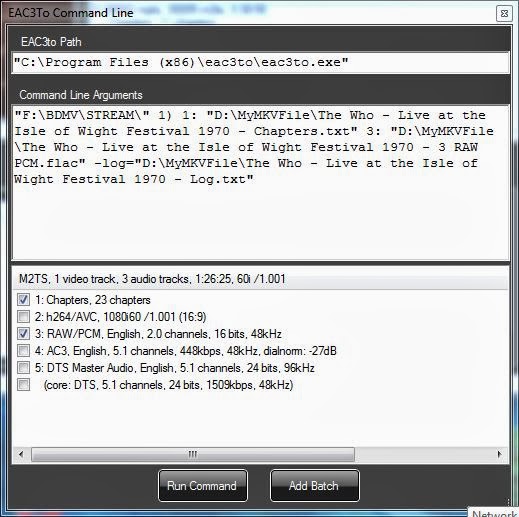
As you can see, it has created an 'eac3to.exe' command with arguments for extracting the chapters and the RAW/PCM audio tracks. This Blu-ray doesn't include subtitles, so that isn't listed. There are a bunch of components that 'Another EAC3toGUI' didn't pick, including the h264/AVC video track and the DTS Master multi-channel audio track. Normally, it chooses the highest quality audio and video tracks by default. For some strange reason, 'Another EAC3toGUI' doesn't like interlaced video. As you can see above, the video track is listed as 1080i60. The "i" means it is interlaced. The highest quality audio track is the least compressed format and in this case that's the uncompressed RAW/PCM. Actually, since the DTS Master Audio is lossless, its quality is the same as the uncompressed PCM, but that's the choice this program makes by default. I would like both, so I'm going to pick the checkbox for '5: DTS Master Audio, English, 5.1 channels, 24 bits, 96kHz'. I also want the video track, so I'll pick '2: h264/AVC, 1080i60/1.001 (16:9). Since I don't want any of the other components, I'll leave them unchecked. Before picking the 'Run Command' button, I can review the 'eac3to.exe' command arguments. Normally, I'd just run the command, but I know from experience that the current settings won't work.
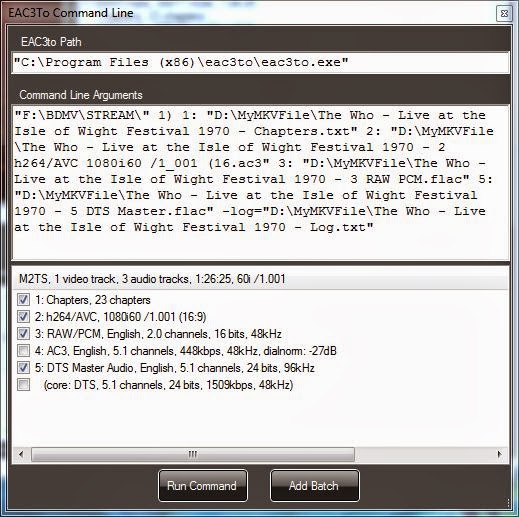
The command line part after 2: doesn't make any sense to 'eac3to.exe' and it will just make the program end in error. For some reason it seems to misinterpret the "(16:9)" part and it changes it to "(16.ac3", so I've edited it to an argument that will work. I've simply deleted everything past 1080i60 and replaced with ".mkv", which will put this video track into a temporary MKV container.
Now, I'm ready, so I can pick "Run Command." This will activate a command window and you can see 'eac3to.exe' do its job.
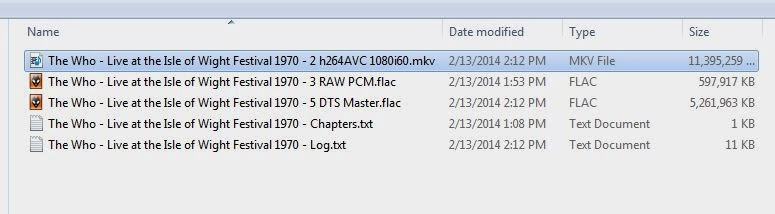
The resulting four files (a chapter file, the video file, a stereo PCM audio file, which will be converted to stereo FLAC, and a multichannel FLAC audio file from the DTS Master Audio track) will be stored in the folder I've chosen for the output. In this case, that's a folder I've named "MyMKVFile."
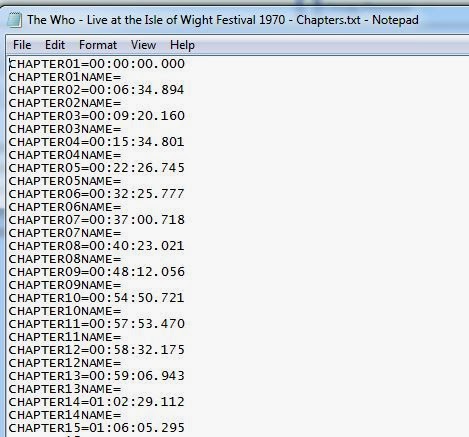
I have everything I need to create the concert video MKV and surround sound and stereo albums for my music library. First, I'm going to generate the audio albums. The FLAC files I have are audio of the whole concert. I would like to split them into individual tracks for each song. To accomplish this, I'm going to create a CUE file, which I can use to split the audio into separate files. A CUE file, is a metadata file which describes how the tracks of a CD are laid out and are stored as plain text files and commonly have a ".cue" filename extension. All I need is the start time information in the chapter file and the song titles listed on the back of the Blu-ray's sleeve. The number of chapters in the chapter file match the number of songs listed on the sleeve. Here's a snippet of the chapter file. To create the CUE file, I use a template, with the basic format, instead of starting from scratch. Here's a portion of my edited CUE file:
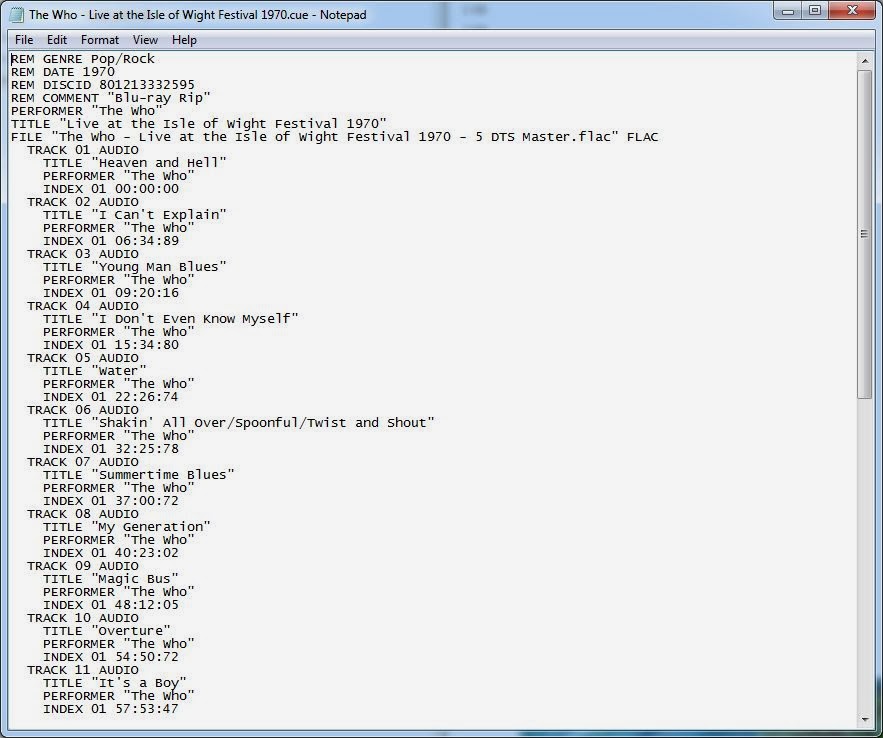
I've used the times from the chapter file for the start times of each track. The format for time is a little different in the chapter file and the CUE file. The chapter file uses HH:MM:SS.xxx and the CUE file use MM:SS:xx (where xx or xxx is fractions of the second). So for a chapter that starts at 01:06:05.295, I wrote 66:05:29 for the track start in the CUE file. You can test your CUE file with any program that can read them. I usually use foobar2000 because it's quick and easy. After right clicking the CUE and picking 'Open with foobar2000' I can see if it worked and I can test each track to verify that I've got the right times and track titles.
Using foobar's convert tool, I'm going to generate individual tracks from the big FLAC file identified in my CUE file. I have the convert utility set to convert to FLAC, so basically all it will do is create the 23 individual tracks. You can also accomplish this with other programs like JRMC. Once I've generated all my tracks for the FLAC file that was originally multichannel DTS-HD MA, I can repeat this process for the stereo RAW/PCM tracks. All I have to do is edit the CUE file and change the designated file so it uses the RAW PCM file instead of the DTS Master file.
I now have the individual audio tracks, both stereo and surround, and I can move them to my media server and import them into my JRMC music library. This Blu-ray also included some bonus material. I can use 'Another EAC3to GUI' to select the 2nd playlist where these bonus tracks were stored and then run through this process again.
Now that I have my audio albums, I can create my concert movie. The original full length audio tracks are still intact because foobar2000 did not delete the original files when it generated the files for each songs. So this brings us to the second part of the manual ripping method. I need to merge everything together into a concert movie, so I have a single MKV file of the audio and video. For this, I am using a program called 'mkvmerge GUI'. MKVmerge is the program 'Another AEC3to' uses to merge everything together during it's automated process. I am using a version of this with a nice graphical user interface (GUI). MKVmerge is part of MKVToolNix, which is a set of utilities for MKV files.
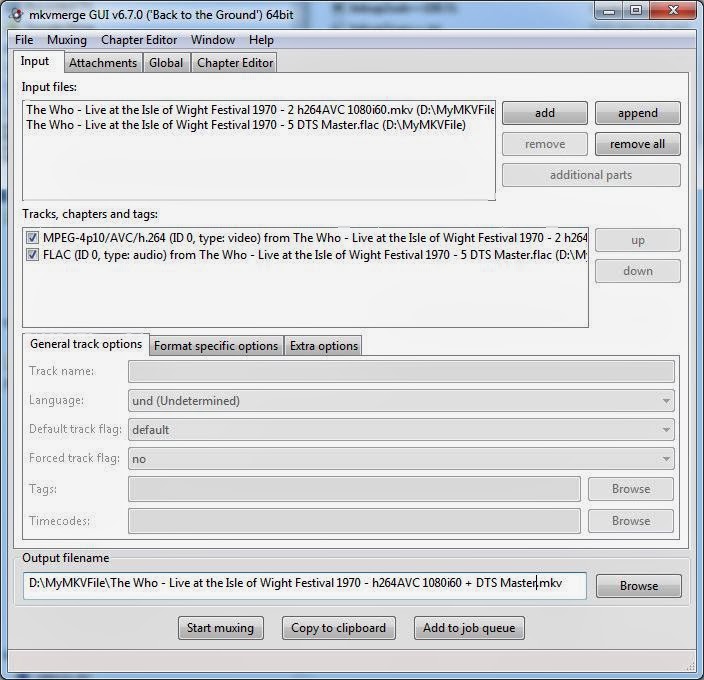
I've picked the 'add' button to add my audio and video files to the 'Input files' list. Using Windows Explorer you can also drag and drop these files into the 'Input files' section. As you can see above, I'm only including the multichannel FLAC file that was originally DTS-HD MA, but I could include the stereo PCM audio if I wanted both audio tracks. I don't, so I've only added the multichannel track. Next, I'm going to add the chapter file, so I can navigate from song to song (chapters) when I play the MKV with the software players on my computer. To do this, I've selected the 'Global' tab and browsed to and selected the chapter that was created with 'Another EAC3toGUI'. Before selecting the chapter file, I edited it using notepad and added the names of the songs to each chapter. The 'mkvmerge GUI' program also has a utility for editing your chapter names. Sometimes I use it to double check that I've got everything correct. To check your chapter titles, select the 'Chapter Editor' tab and drag and drop your chapter.txt file into the editor window.
I could have used this editor instead of notepad, but I think notepad's a little faster.
I can now merge everything into a single MKV file now that I've got the audio, video and chapter files selected and the output filename set to the location and desired name. Now I just pick the 'Start muxing' button and wait for it to finish.
It will take about 30 minutes to generate my merged MKV file. When it's finished, I can move this file to my media server and use 'My Movies', JRMC and/or WMC to add it to my movie library.
Here are the links to the programs I've used during the manual method:
Another EAC3toGUI-Plus info. This info page includes links to all the other utilities 'Another EAC3toGUI' needs to work. This site may also provide more details than I have in this article. It should cover features that I haven't used here. Mike Eby, the author of 'AnotherEAC3toGUI, also provides a link to a user guide written by a guy named Damien called "
MKV Mania: Another EAC3to GUI." Damien also provides links to everything you need.
MKVToolNix is the set of tools you'll need to work with MKV files, including 'MKVmerge GUI'.
2. Automated Blu-ray Ripping
Now for the easy method...
Buy
MakeMKV. And NO, I don't work for them. Actually, I think they have a trial period, so you can test it before you spend any money. I think the trial is fully functioning. This is the program I use for ripping my Blu-rays most of the time. In the case of concert Blu-rays, I may use the manual method described above to get my audio tracks and then use MakeMKV to extract and create my concert movie.
MakeMKV works out of the box, you don't need to download a bunch of other utilities to get it to work. You don't even need a disc decrypter like 'AnyDVD HD'. In fact, if you have it running, MakeMKV will suggest disabling it before proceeding.
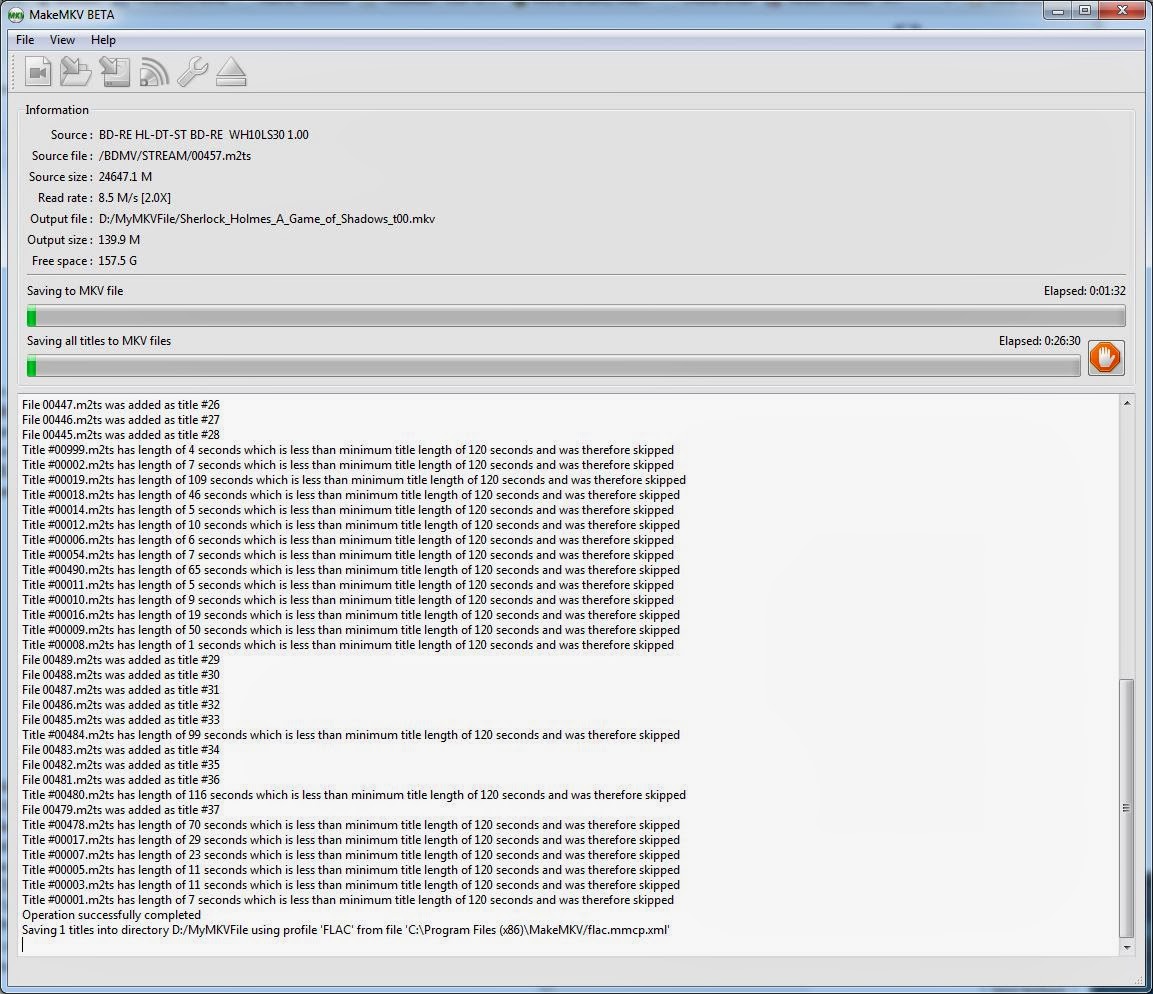
For this example, I'm going to rip the disc from my "Sherlock Holmes - A Game of Shadows" Blu-ray. After inserting the disc in my BD drive, I've launched MakeMKV:
First, I make sure it is set to my BD drive and then I pick the Blu-ray icon near the middle of the screen. The program analyzes the disc and displays a list of all the titles.
The results show there are quite a few titles. Normally, with most movies, it's pretty obvious which title is the main feature. It's usually the largest sized title. With TV series discs, it's not quite as easy. Unfortunately, MakeMKV doesn't have any way to preview these titles. In this case one of the titles is identified as the main feature (that's not necessarily the case with all Blu-rays), so I'm going to deselect the other titles since I only want to create one MKV movie file. I've clicked on the little triangular icon to expand the tree. This will show all the components included with the titles, such as the audio tracks and subtitles.
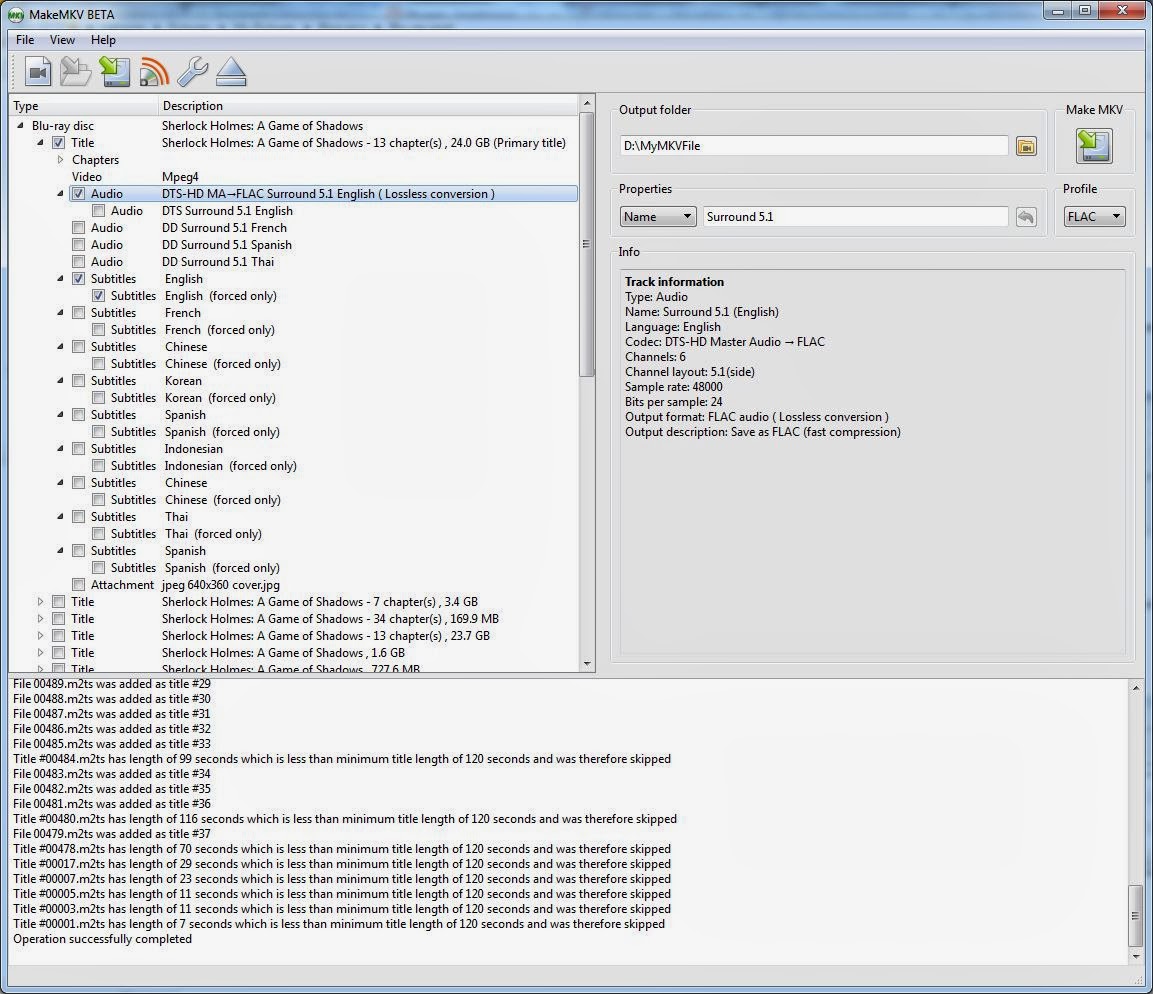
I've removed the checkbox from everything except the high resolution DTS-HD MA track and the English subtitles. I've selected both the English subtitles and the English forced subtitles. By checking the 'forced only' branch, it will only included the forced subtitles. Normally I don't want all the subtitles of an English movie. However, some English movies will have foreign dialog, like the movie "Argo," and with forced only checked I will get subtitles when they are speaking Farsi. You can also see that the DTS-HD MA track is going to be converted to FLAC. That's because I'm using the FLAC profile. If I change the profile to 'Default' it will not convert the DTS-HD MA track and both the audio and video will be in their original formats. Once all my programs, JRMC, MPC-HC and WMC were capable of using the LAV filters, I've been able to play the original DTS-HD MA tracks. So I really don't need to use the FLAC profile. Next, I'm going to pick the 'Make MKV' button to rip and generate my MKV movie.
That's it! After about 30 or 45 minutes, I'll have my MKV file and I can move it to my server and add it to my movie library. As you can see, that's a much simpler method than the manual method described above. However, you can't extract just the audio by itself. MakeMKV will only create a complete A/V movie file. You could open the resulting MKV file with 'MKVExtractGUI2', which is one of the tools included with MKVToolNix. Then you could extract the audio and chapter files, and follow the steps in the manual method above for creating the cue file and splitting out the tracks.


