Showing posts with label Conceptual prototype. Show all posts

Thursday, September 21, 2017

Prototype For Sale

I'm no longer in need of my original prototype, so I'm going to sell it as-is or part out the individual components. I plan to post the sale on eBay, Craigslist and some Facebook groups dedicated to audio. When I get a chance to take some photos, I might update this post. If you are interested, feel free to contact me at gregg dot plummer at gmail dot com.

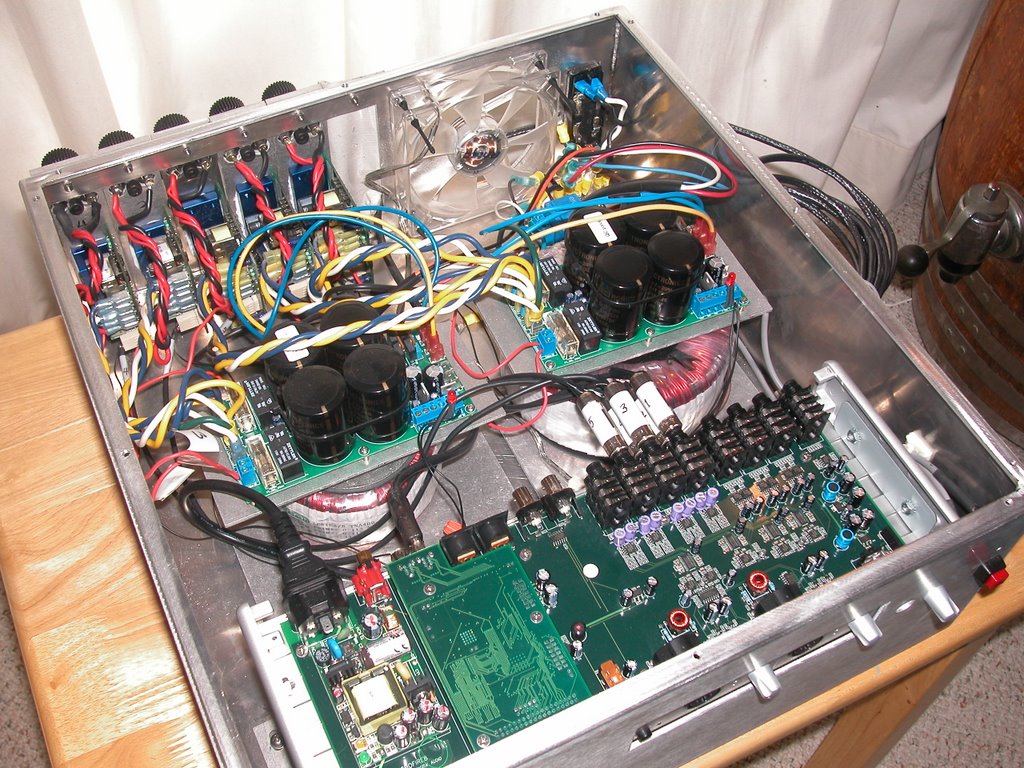
This first prototype consists of a combination of amp modules and a FireWire audio interface in a utilitarian aluminum chassis. I was pretty concerned with overheating because of the 5 high powered amps so I used a fairly thick aluminum to help dissipate any heat. It's also vented at the top, just above the amps and there's a very quiet 120mm fan to blow air out the back. BTW, I worked with a mechanical engineer who did some thermal analysis on the prototype to make sure we dissipated the heat. It was probably a little overkill. My price for the prototype is $825. My cost, not including the considerable amount of time designing, building and testing were about $2,500.

The components included are:

Aluminum Chassis - this includes the 120mm fan, special mounting plates for the power supplies and mounting brackets for the audio interface. On the back is the A/C receptacle with a switch (A/C line cord included) and a 10A Bussman time delay fuse socket. On the front, there's a momentary pushbutton switch that has 2 operation modes. In one mode, the audio interface is powered on while the amps remain off. The other mode switches on the audio interface and all the amps. Not sure if anyone would be interested in this because the layout is designed specifically for the rest of the components. The price for the chassis is $295 $100.

Power supplies - At the time of this design, the only practical choice for the system were linear power supplies. I really wanted to incorporate SMPS (switch mode power supplies), but ones with the characteristics I wanted for this high-quality audio application were not available. I used different amps for the front and rear channels, so the system utilizes 2 different power supplies.

  • The power supply for the rear channels includes a 400 VA (115/33 Vx2) toroidal transformer and a Hypex HG power supply. My prices are $65 for the 400VA toroid and $100 for the Hypex HG PS.
  • The power supply for the front channels includes a 1000 VA (115/45 Vx2) toroidal transformer and a Hypex HG power supply. These are $100 for 1000VA toroid and $100 for the Hypex HG PS.
Amplifier modules - I used the highest quality Hypex UcD amp modules that were available at that time. This prototype only needed to provide power to 5 channels because, in a typical 5.1 home theater system, the subwoofer is self-powered (channel .1). To each amp module, I attached an aluminum plate heat sink with fancy Neutrik speaker binding posts.
  • The 3 front channels - right, center, left use Hypex UcD400AD amp modules. These are each rated at 400W RMS into 4 ohms. Unfortunately, only 2 of the 3 are currently working. The one I was using for the center channel has a faulty component that causes the amp to output a terrible thumping sound. So, I'm including it for free with either of the other working modules. I think it just might need a new cap but I'm not sure and Hypex no longer services this amp. The price for the working UcD400AD modules is $85 each or $165 for the pair. 
  • The 2 rear surround channels use Hypex UcD180AD amp modules. They are rated at 180W RMS into 4 ohms. My price for a UcD180AD module is $65 or $125 for the pair.
Audio interface - this is the device that your PC will use as the audio device or soundcard in your HTPC. It was the AudioFire8 and was sold by Echo Audio for something like $750. This is a high quality 8 channel FireWire audio interface typically used for audio recording and mastering. I took mine apart and reinstalled it inside my chassis. A rectangular port is cut into the front of my chassis to access the front of the AudioFire8. I also paid Echo Audio $5000 to write a custom multichannel driver so my device could output surround audio. Since my center channel amp stopped working, I used the AudioFire8's software console to reroute the center channels to the front left and right channels balanced evenly. It's now a working 4.1 system and still sounds great. I can put the AudioFire8 back in its original chassis and sell it for $175. Echo Audio still has drivers on their website that you can download for Windows 7, 8 and 8.1. They are no longer developing audio interfaces and have discontinued further updates so it may not work on Windows 10.

Misc components - A handful of components were included to complete this system. To avoid the loud click that normally happens when you turn on the amps, I added Hypex's softstart module. To connect the AudioFire8 to the amps, there are custom cables with 1/4" TRS connectors. Also included is all the hookup wire between toroids, power supplies, and amps.

UPDATE 2/14/2018: Items that have sold are indicated as such by striking the text. I've listed the remaining items on Craigslist here:

https://madison.craigslist.org/ele/d/diy-amplifier-components/6494593237.html

I've reassembled the Echo Audio AudioFire8 and reduced the price to $100:

https://madison.craigslist.org/msg/d/echo-audio-audiofire8-audio/6494579793.html

I'm also selling an M-Audio FireWire 410 for $75:

https://madison.craigslist.org/msg/d/audio-firewire-410-audio/6494554911.html

AND, I'm selling the 5.1 speaker system that I used to demo my prototype. These are awesome speakers:

https://madison.craigslist.org/ele/d/era-design-5-speaker-system/6476114140.html

Wednesday, March 21, 2007

More Information on the new UcD Amplifiers

Jan-Peter responded to more diyAudio inquiries with the following information:

We have taken our time to review a lot of different brands of capacitors, the caps we have chosen perform extremely nice. To be honest we are very happy to find such a good performing capacitor.

The complete list of changes are:
  • Audiophile version of the UcD Modulator (small PCB).
  • using Mini Melf resistors and NP0 capacitors on critical places in the Modulator and around the buffer op amp.
  • Audiophile decoupling capacitor, 220uF/100V. (with own printing)
  • PSRR improved of the local power supply regulator for buffer stage.
  • Audiophile AC coupling capacitor in input stage.
  • THD further reduced.
  • improved temperature stability.
  • all potentiometers are Sealed Bourns 3362 P.
  • optional a soon-to-be-released extra 12V full discrete regulator with extremely good specs.
  • and we will use the LM4562...we love this op amp...
UcD180HG extra updated:
  • better power FET, lower gate charge for faster switching/lower THD.
  • the same type of output coil as the UcD400ST/AD/HG
In about 3~4 weeks we will have them available.

Tuesday, March 20, 2007

Exciting News from Hypex


We are using Hypex amp modules in our current prototype. So far, they are the best Class-D modules we've found and are the leading candidates for our commercial products. According to a recent post in the diyAudio Class D forum by Jan-Peter van Amerongen, Hypex's Founder and General Manager, their next generation 180W and 400W amplifier modules will receive the following upgrades:
  • Audiophile version of the UcD Modulator (small PCB).
  • Audiophile decoupling capacitor, 220uF/100V. (with own printing)
  • PSRR improved of the local power supply regulator for buffer stage.
  • Audiophile AC coupling capacitor in input stage.
  • THD further reduced.
  • improved temperature stability.
  • optional a soon-to-be-released extra 12V full discrete regulater with extreem good specs.
  • and we will use the LM4562...we love this op amp...
"It will be our state of the art product.... "

We've been very happy with the performance of the first generation, especially after a few tweeks. I can't wait to hear these. Now, I wonder when they'll finish their SMPS...

Thursday, September 21, 2006

So, When Will It Ship?

I've been asked several times about the ship date for our product. I don't have an answer for that, but I can tell you about the changes or improvements we need to make to the current prototype before we are ready to ship a commercial product. In this post, I'll give a general overview of improvements needed for each of these subsystems:
  1. the chassis
  2. power supplies
  3. amplifier modules
  4. soundcard section
    a. computer interface
    b. drivers/software
    c. digital/analog section - DACs, ADC, etc.
I will provide more detailed information about each of these sections in future posts.

As you can see from the prototype photos, the current chassis is not something many people would want in their living or family rooms, unless they're really into the industrial design style. They actually might look kind of cool in an a loft space or something, but that is sooo 90's :). So we need to come up with a more aesthetically pleasing design. We would also like to minimize the size and weight, and allow for optimal heat dissipation. Fortunately, the internal components are relatively small and don't generate too much heat so we should be able to create a chassis that isn't a monster. We'd also really like to design a chassis that would let do-it-yourself (DIY) people build or upgrade their own systems. Much like you can do with PC today. This means the inside of the chassis would include the framing to mount things like power supplies, the printed circuit boards and amp modules. Ideally, the amp modules would simply slide into slots in the back of the chassis.

The main changes we plan to make with the power supplies for our commercial product will be to replace the linear power supplies with switch mode power supplies (SMPS). The latest SMPS technology designed for audio applications is very promising. Compared to general purpose SMPS, the SMPS designed for audio applications usually have much larger capacitors to provide a larger energy reserve for the faster and deeper current demands. General purpose SMPSs are typically designed for fairly constant loads, so they don't usually have large enough capacitance at the outputs for audio applications and adding capacitance to a general purpose SMPS wouldn't work very well because the feedback circuit doesn't take into account this additional capacitance and the added phase shift and oscillation would make it unstable. The main benefit with using the SMPS instead of the linear supplies is since they operate at a much higher frequency, they can be much smaller and lighter than the equivalently powered linear supplies we were using. Since a SMPS recharges its capacitors about 1000 times faster than the rate of a linear power supply, which needs a fairly large transformer and big capacitors to keep up with the current demand, the SMPS can get by with smaller capacitors.

We are pretty pleased with the amplifier modules in the conceptual prototype. The amp modules we've tested are from Hypex Electronics, a Dutch amplifier manufacturer who has developed a very good reputation for high quality products. There are a few things that can be done to optimize these for our application, which will be done if we decide to use their UcD amps in our commercial products. Since we started this business, we have discovered a few other class-D amplifier modules from other manufacturers worth considering. And there is also the possibility of developing our own class-D amp, but unlikely considering the development costs and time. To accommodate our modular chassis design, we would really like to find an amp module that will fit into a small enclosure. This enclosure would be similar to the case of a hard disk drive. It would protect the circuit components, dissipate heat and would allow for an easy method to insert the amp into the back panel of the chassis. If the sizes were standardized, you could upgrade or replace amp modules when newer, better designs were available by simply unplugging the old amp and replacing with the new. We would also be happy to support more than one amplifier manufacturer. Some of the class-D amp modules have a reputation for being very accurate and transparent to the source. These amps sound great, but if the source material isn't very good, like a poor recording, the flaws are pretty noticeable. Other class-D amp modules might be a little more forgiving of these types of recordings. I guess it all depends on your listening preferences. I think it would be nice to have a choice. Now, if only we can find a few manufacturers to work with us on a design for these standard amp cartridges. Wouldn't it be great to have the options of different amp modules just like you currently have with hard drives or video graphics cards?

The soundcard section is where we have the most work ahead of us. The current unit in our conceptual prototype was designed primarily for pro-audio applications - recording and mixing. There are quite a few components that aren't needed in a music playback or home theater system. For example, we don't need 8 balanced inputs if the audio source is the PC. The analog outputs of the pro-audio soundcards are good and usually sound better than your average A/V receiver, but they may not sound quite as good as the high-end dedicated preamp/processors. Their outputs are designed to be good enough for an audio engineer to monitor a mix, but might not meet the needs of someone that is really into critical listening. Our goal is to design a soundcard that sounds as good as some of the high-end dedicated prepros, but at a much lower cost. We've also got a lot of work to do on the software - both the drivers and the control panel applets for controlling things like volume, channel mixing, etc.

Like I said, we'll cover each of these areas in a little more detail in future posts. Please let me know what topics you would like to learn about first.

Wednesday, September 06, 2006

Prototype Photos

Here are some photos of our conceptual prototype:

←This is the front view. It shows the aluminum chassis (0.125" thick) and the controls for the soundcard section. I know it's kind of ugly, but it serves its purpose. This soundcard includes 2 Neutrik combo connectors (for both 1/4" TSR and XLR microphone inputs), a 48V phantom power switch, level controls and LED meters. There's also a basic momentary pushbutton for the amplifier modules on the far right.


→With the cover off, you can see the internal components. The soundcard is near the front (bottom of the pic), the toroids and power supplies are in the middle, and the amp modules are mounted on the back. The amps for the 3 front channels are rated at 400W into 4Ω loads, while the 2 rear channels use amps rated at 180W into 4Ω loads. Since these amps have different operating voltages, we needed 2 toroids and power supplies.

←This picture shows a rear view of the prototype. The amp modules are attached to 1-1/2"x6"x1/4" bars of aluminum, which serve as additional heat sinks. We are using Cardas patented binding posts for the speaker connections. We've also used a quiet (and slow) 120mm fan to pull heat out of the interior space. After testing, we've discovered that the amps run pretty cool and some of our efforts to dissipate heat might be overkill. A little over-engineering can't hurt.

Click on the pictures to get a larger view.

Wednesday, August 16, 2006

The Conceptual Prototype

The purpose of the conceptual prototype was to build a device to show potential investors our concept and demonstrate the benefits of using a personal computer to organize and play music or audio. It's hard to explain the benefits of a product that integrates an external soundcard with high quality amplifier modules. It is a lot easier to demonstrate when connected to an HTPC.

Since we have fairly limited funds, it was important to make the prototype with components that wouldn't take a lot of time or cost a fortune to build. So the conceptual prototype is made up of some "off-the-shelf" components. We used a commercial external FireWire based soundcard typically used for professional audio engineering applications and class-D amplifier modules that are available for DIY audio amplifier builders. Since this is a 6 channel system which requires 5 channels of amplification (the 6th channel for the subwoofer or LFE channel does not require amplification because the subwoofers typically are purchased with their own amp), and we want our system to be a modular or flexible system, so we included 3 400W amp modules for the front left, right and center speakers and 2 180W amp modules for the rear left and right speakers. Since the 400W and 180W modules require different operating voltages, we also had to include separate power sections for the front and rear speakers. So we had to have 2 custom toroidal transformers built for the prototype because we couldn't find any stock toroids to meet our needs. Next, we had to add circuitry for converting the AC voltage into the DC voltage needed to power the amp modules and circuitry to limit high in-rush currents during start up. To complete the prototype, we had to build a chassis that could hold everything together in a nice neat package and dissipate any heat generated by the components without generating any noise.

So I now have a box that connects to my HTPC using a FireWire cable and to my Precision Monitor 10 loudspeakers using speaker wire.

Instead of trying to explain the advantages of using a PC to play music, I can now demonstrate that it sounds really good. So during the demonstration they get to hear a really good sounding system and learn a little about the advantages of using a computer for managing your collection and playing music.

It really does sound good. I don't consider myself an "audiophile," but I do appreciate good sound. I've owned a variety of fairly high end esoteric systems in the past, including a pair of Beveridge Model 2 SWs, a modified HQD system, B&W Matrix 801s with an assortment of electronics from Mark Levinson and Audio Research. Not the highest of the high end, but still pretty good sounding stuff. Actually, I had to get rid of the HQD system because it just was too big for my space. My system included a 27" Hartley driver in this huge, heavy subwoofer enclosure that was something like 4'-6" wide x 4'-6" deep x 3'-6" high. The double stacked Quads looked like a pair of big solar panels. It just took up too much space and was far from meeting good GAF or WAF (girlfriend/wife acceptance factor). I really downscaled after the HQD system. Through a series of trades and purchases, I ended up with an upgraded Dynaco ST-70 amp, an Electro Research EK-1 Phono Cartridge/Preamplifier System, Linn Sondek LP-12 turntable and the Precise Monitor 10 loudspeakers. The speakers were probably the weak link in the system (and the amp didn't have a lot of power). However, they were about the same size as the B&W 801s and seemed to have a little more clarity. The tube amp at 35W/channel provided enough power to drive the Monitor 10s, which have a rated efficiency of 88db, to pretty loud listening levels. Anyhow, I was pretty surprised to hear how much better the Monitor 10s sound now that they are hooked up to the class-D amp modules. They are really amazing sounding speakers. I hate to sell them, but could use the cash.

I haven't had as many demonstrations/auditions as I would like, but I've had the opportunity to play the system to a few investors or potential investors, along with a few of my friends and family. Even my wife is impressed and it takes a lot to impress her when it comes to hifi. My Dad, who is a fan of big band music, swing, etc. was very impressed. I played some Frank Sinatra recordings from the 60s and he was amazed. Then I put on a recent Michael Buble' recording and he nearly fell off his seat. Obviously the modern recording took advantage of the latest and greatest studio recording equipment and would naturally sound better than something recorded in 1961.

Now we are working on the "working" prototype. This will be much closer to the actual commercial product. The pro soundcard used in the conceptual prototype has a lot of functionality specifically for recording. Our soundcard component won't need a lot of the recording components, but will need functionality specific to home theater like bass management and digital room correction features. There are also a few options for enhancing the amp modules and power supplies which we will want to include in the working prototype. In future postings, I'll share some more of these details.

Tuesday, August 15, 2006

Amplio Audio's first prototype

Our company, Amplio Audio, is currently developing a product that combines a computer's soundcard with high quality class-D amplifier modules. Our first "conceptual" prototype is basically a 5.1 surround sound (6 channel) product. In a future post, I will provide photographs of the completed conceptual prototype. The prototype (I haven't given it a name -- any suggestions?) has performed very well. It is currently hooked up to our HTPC (home theater personal computer). The HTPC is also connected to our network. I currently use J.River's Media Center 11 to play music from my library of losslessly encoded WMA tracks, which are stored on a media server on the network. To listen to the system, I have a pair of Precise Monitor 10 full range 3-way loudspeakers connected to the prototype. We also have a full Era 5.1 speaker system that we plan to use for future testing (so, the Monitor 10s are for sale!!).

The prototype product currently includes the following components:

  1. the chassis
  2. power supply - toriodal transformers and power supply PCBs
  3. amplifier modules
  4. FireWire interface
  5. digital/analog section (DACs, ADC, etc.)

I will provide more information about each of these sections in future posts.


Powered By Blogger