Showing posts with label hd audio. Show all posts

Wednesday, September 20, 2017

USB Audio Class 2.0 Support in Windows 10, FINALLY!!!!

I was just reviewing this blog and I realized I mentioned that I'd provide updates if anything changed regarding a Microsoft driver for USB Audio Class 2.0 in a previous post way back in 2014. I failed to mention this when it was first news last Spring (2017). Besides, I don't think Microsoft made any big announcement about this. People just started to notice that the latest Microsoft Windows 10 Creators Update (a.k.a. Redstone2 or RS2) includes a new USB Audio 2.0 class driver, usbaudio2.sys.

I'm not sure if this native driver supports multichannel surround but several people have used it for high-resolution stereo. Just do a google search for "USB Audio Class 2.0 Windows 10" and you'll see numerous discussions about this.

Confirmed: Windows 10 now supports USB Audio Class 2.0

USB Audio 2.0 Class Driver in latest Windows 10 RS2

USB Audio 2.0 support coming to Windows 10 from Microsoft

Finally, after years of nonsense decisions, Microsoft is working to add a native class driver for USB Audio 2.0 devices. They are testing it in the latests Windows Insider versions:
'Native support for USB Audio 2.0: We now have native support for USB Audio 2.0 devices with an inbox class driver! This is an early version of the driver that does not have all features enabled, for e.g.: only playback (render) is supported with this version. Recording (capture) support is scheduled to arrive in later iterations. We encourage you to play with the driver and let us know what you think (using the Feedback app). If you already have third party drivers for your USB Audio 2.0 device installed, follow instructions in this blog post to switch to using the inbox class driver.'
Latest Windows 10 build brings native support for USB Audio 2.0

 Oh well... it's too late for us. Amplio Audio is no longer.

Friday, February 14, 2014

Playing and Ripping Blu-rays with your PC

After finally posting my SACD ripping article, I decided to do a quick follow-up and describe my method for ripping and playing Blu-rays with my PC. I've been using the same method for a fairly long time and haven't bothered to learn if there is a new method that might be better. Again, leave a comment if you know a better method.

First, I'm going to address the issue of Blu-ray playback using my PC. Back in the end of 2008 I posted an article about problems I had playing Blu-rays with my PC. I had trouble because my hardware didn't comply with the software Blu-ray player's DRM technology. Programs like Cyberlink's PowerDVD and ArcSoft's TotalMedia Theater check if your hardware has a protected audio path (PAP) and if not, will decrease the audio bit depth and sample rate to 16 bits and 48kHz. My setup, which doesn't have a "protected path," is capable of 24-bit/192 kHz playback, so I was/am disappointed with this downgrade. Of course the purpose is to prevent piracy. The industry doesn't want to let someone capture the perfect bits and share them on the Internet, like they can with tracks from CDs (and DVDs, and with a bit of work, SACDs).

Two of our PCs connected to our home network are Blu-ray capable. Our HTPC in our family room has a BD-ROM drive and the PC in my office has a BD burner. The HTPC has my prototype audio equipment (8-channel DAC and Hypex Class-D amp modules) and it doesn't support PAP, so with ArcSoft's TMT3 the audio gets downgraded. The PC in my office has an ASUS soundcard that is PAP compliant, so TMT3 doesn't downgrade the audio there. ArcSoft has since been upgraded several generations and the current version is 6.5. I haven't bothered to upgrade because they still downgrade the audio, and I can't find any other advantage to upgrading.

We prefer to watch Blu-rays in the family room because the HTPC is hooked up to a nice 47" flat screen HDTV and the audio system is very good. The PC in my office is connected to a 24" LCD monitor and even though the audio system in my office is pretty good, it's not nearly as good as the one in our family room. After a little research (HD to mkv ....the options are endless), I figured out how to play the main movie/feature of the Blu-rays with the HTPC (family room) without downgraded audio. If I ripped the video and audio from the Blu-ray disc and put the audio into a FLAC (free lossless audio codec) container and then merged the audio and video into an MKV file, I could use other players to watch my Blu-rays. Here's the trade-off: I could no longer just insert the Blu-ray disc into my BD drive, run TMT3 and navigate the menus to watch the movies and/or extras. Now I could only play the MKV file, just like I would with any other video file on my computer. At least the audio was no longer downgraded. So, when you extract the audio and video from a Blu-ray, you can choose to get the main feature and whatever extras, but they become separate audio/video files. So you can no longer use that nice Blu-ray menu to navigate the content on your disc. I decided I could live with that for the main feature. If I wanted to watch the extras, I could simply insert the Blu-ray disc in the drive and navigate the menus. Most of the time the audio quality isn't that great in the special features anyhow.

I'll cover my ripping methods in a little more detail, later. To play the MKVs extracted from my Blu-ray discs, I can use either WMC (Windows Media Center), MPC-HC (Media Player Classic - Home Cinema) or my current favorite, JRMC (J.River Media Center). There are other programs like VLC media player that can play these MKVs, but I prefer WMC, MPC-HC or JRMC. At first it was a little tricky to get everything to work. At the time (this was several years ago), I needed the correct combination of codecs installed on computers. It all seemed pretty confusing, but by following the recommendations I found online, I finally got it to work. The main components I had to install for ripping and playing MKVs sourced from Blu-rays were a DTS decoder, which can decode the high resolution DTS-HD Master audio tracks commonly used in Blu-rays, a program that can split the audio and video tracks into separate files and another to merge them back together. Like I said, it was a little complicated at first. Thankfully, it's become a lot simpler now. One of the key components, the DTS decoder, is included with my copy of ArcSoft's TMT, so that's why it is still installed on my systems. Occasional I run TMT3 to use the menus, but most of the time, I never use it for watching the main movies. If you decide to use WMC or MPC-HC to play your MKVs, you'll need to make sure you have the right codecs and tools installed. If you use JRMC, you really don't have to worry about installing a bunch of codecs, everything you need is provided when you install JRMC. Also, when I first played MKVs from Blu-ray, I had to convert the audio tracks to FLAC if I wanted to listen with full resolution. Since then, new codecs or tools are available that let me play the original DTS-HD or Dolby True-HD audio tracks with MPC-HC or JRMC. Thanks to a German guy named nevcairiel and his LAV Filters, you can now play all the audio codecs with these other players.

The best user interface for playing our movies is WMC. And to compliment WMC, I use 'My Movies' to help manage my collection and display a very nice menu strip in WMC. 'My Movies' is also used for organizing the DVDs stored on our media server. The UI for JRMC is a close second to WMC and the MPC-HD UI is the most basic, because it doesn't have a nice menu list of our movies, like you get with WMC or JRMC (note: JRMC takes a little tweaking to get a menu list of movies, so it's a little more work than WMC). However, JRMC seems to give us better playback results. The audio and video quality are a bit better than the quality we were getting when using WMC. However, the WAF (wife acceptance factor) of WMC was higher and she didn't really notice the quality difference. There was one major annoyance that convinced my wife and kids to switch to JRMC. When you play a full resolution Blu-ray, the audio tracks have a fairly high dynamic range. There's a big difference between the quiet and loud passages. My family is very sensitive to loud noise (I'm much more tolerant) and whenever there are explosions or other loud passages, they quickly use the remote to lower the sound level. Then when the dialog is quiet, they increase the volume. It's particularly annoying when the quiet dialog is suddenly interrupted with a big explosion. So when we are watching movies, my wife is constantly adjusting the volume to find a comfortable middle ground. Now, with the latest version of JRMC (v19), they have a new DSP feature called "Adaptive Volume" that automatically adjusts playback volume. It dynamically adjusts the volume, while preserving dynamic range, so loud and quiet parts are a little closer (normalized) and you no longer need to constantly adjust the volume while watching. WMC doesn't have this type of feature.

There are several programs out there for ripping Blu-rays. I'm going to describe my two favorite methods. The first method is a little more hassle because it involves multiple steps. I'll refer to this as the manual method. The second method is much easier because you run a single application with a nice user interface and a few simple steps. Both of these methods preserve the original quality of the audio and video of the Blu-ray. There are other programs that will reduce the resolution or bitrate if you want to watch the movie on a portable device like your smartphone or tablet. The methods described here retain the highest quality.

1. Manually Ripping Blu-rays
The reason I'm going to describe the manual method is because I use it for music Blu-rays, like concert performances, when I want to create both a copy of the video performance and another copy of just the audio tracks that I can play in my music library. I'll show some screenshots, but I'm not going to cover every detail necessary to get this to work. You may need to refer to other websites for those details (I'll provide links below).

For this example, I'm going to rip my Blu-ray titled "Live at the Isle of Wight Festival 1970" by The Who. I'm using 2 main programs to rip and create my MKV file, which I will save as a concert movie. I'm also going to use a couple of other tools to extract the audio tracks as individual FLAC files. Then I can add them to my music library. In order to rip a Blu-ray disc, the program will need to decrypt the disc to get around the copy protection (BD+, AACS, and other DRM protections). If the ripping application doesn't have this capability, which is the case with the manual method I'm describing here, then you'll need to install a decrypter and have it running before you can start ripping. I'm using Slysoft's 'AnyDVD HD'. This is a commercial program that I purchased a long time ago (originally, I bought AnyDVD to decrypt my DVDs and later upgraded to the HD version for use with Blu-rays). I also needed 'AnyDVD HD' just to play copy protected discs with TMT3. With 'AnyDVD HD' installed and running, I'm ready to rip this Blu-ray concert disc.

Sometimes I'll use TMT3 to look at the Blu-ray menus. Usually, the menus for a concert disc will list the songs, but sometimes they are organized as chapters. The menus can also be used to identify the bonus features and determine if there might be additional songs or concert footage not included on the main feature. In the case of this disc, the songs are also listed in the insert and on the back of the sleeve. As you probably know, when you rip one of your CDs, the ripping program will pull down information from an online database to provide information for tagging your songs. They will use the database from Gracenote (a fee based service) or freedb (an open source free metadata service) to provide the tags for artist, album, title, genre, etc. These types of databases don't exist for Blu-rays. You'll have to provide this information manually.

Like I mentioned earlier, the manual method is a multiple step process. The first program, eac3to.exe, will extract the audio and video into separate files. It will also save a chapter file and a subtitles file. The audio track will be losslessly converted from whatever version is on the disc to FLAC. Now, eac3to.exe is a command line utility, which isn't exactly the easiest thing to work with, so I use a program that provides a nicer user interface for eac3to.exe called 'Another EAC3toGUI'. Here's a screenshot of the interface:


'Another EAC3toGUI' works if you have all the necessary tools that eac3to.exe uses for extracting and encoding Blu-rays. Before we begin ripping, I'm going to show how this program is setup. By picking 'Options' under the Tools menu, I can verify my settings.
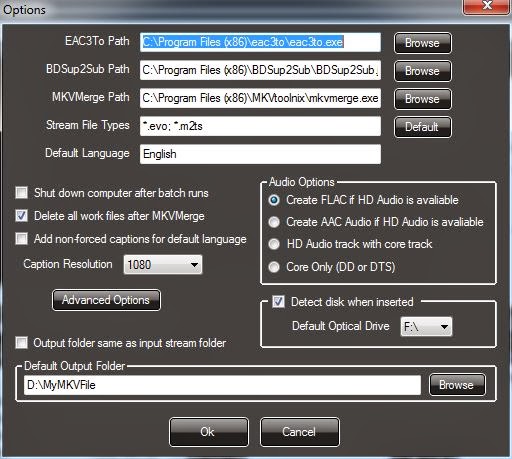
In this dialog, you provide the location of all of the programs used for ripping your Blu-ray. As you can see, you need to include the path for eac3to.exe, BDSup2Sup, which is used to extract and convert the subtitles data, and MKVMerge, which is used to reassemble the audio, video, chapters and subtitle files into the final MKV. As you can see, this program doesn't provide any video options. It will extract the video, but it won't modify or re-encode it in any way. So if the video is encoded as 1080p (1920x1080 resolution) H.264/AVC, that's what you get. There are several options for the audio and depending on the disc, you may have several different audio tracks to choose from. I always choose the highest quality audio track available. Most of the times, a Blu-ray will have a surround audio track losslessly encoded with DTS-HD MA or Dolby TrueHD. If that's the case, this program will convert these tracks to lossless FLAC. There will be no loss of quality going from one lossless format to another lossless format. Sometimes, a Blu-ray will not include a lossless audio track and instead uses a lossy format like DTS or Dolby AC3. If that's the case, 'Another EAC3toGUI' will just save the audio as is without encoding to FLAC.
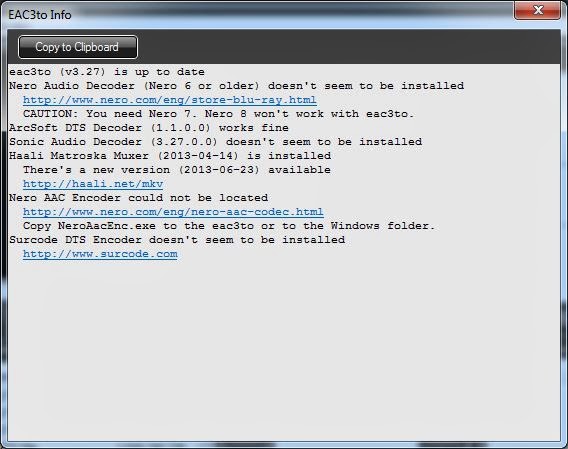
I believe eac3to is short for "encode 'ac3' to". AC3 is the lossy audio encoding format developed by Dolby Laboratories and is commonly used in DVDs. It is also referred to as "Dolby Digital." This tool has been around for a long time and can now handle all of the Dolby format's including their lossless TrueHD format used with many Blu-rays. However, eac3to.exe cannot decode the other popular lossy audio encoding format, DTS (also used on DVDs) and their very popular lossless format DTS-HD MA (used on Blu-rays). That's why I still have ArcSoft's TMT3 still installed. It handles the decoding of the DTS formats. If you pick 'EACto info...' under the Tools menu, you can see if you have the required codecs. I use this program only for ripping Blu-rays, so I don't use some of the other codecs on this list. For Blu-rays, I'm using 'ArcSoft DTS Decoder (1.1.0.0) and for splitting out the audio, video, subtitles and chapters, I use 'Haali Matroska Muxer'.

Now I'm ready to rip. 'Another EAC3toGUI' can rip the main feature from your Blu-ray disc and create an MKV file with the original video merged with the new FLAC encoded audio. You end up with a high quality audio/video file of your movie or concert. However, since I want both the concert video performance and the audio tracks, I'm not going to let 'Another EAC3toGUI' merge everything back together. Instead, I'm going to use the "Command Line" feature to generate the separate components. Looking at the main screen again, you can see that the 'Stream Path' shows the location of the Blu-ray source. In this case, it's my Blu-ray drive (F:) and it automatically found the titles in the STREAM folder. As you can see, it found 2 titles or playlists.
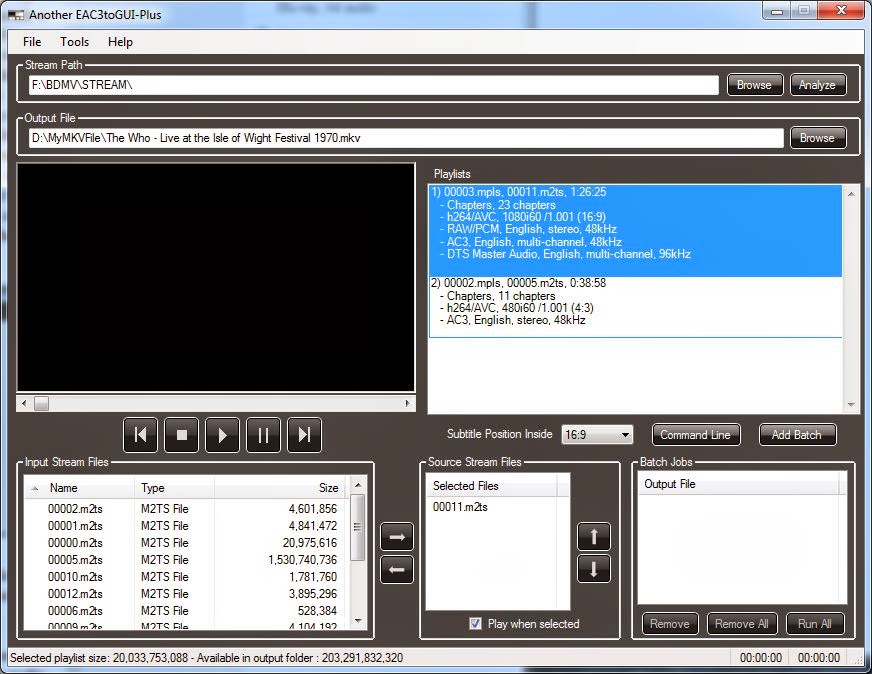
You can usually identify the main feature by the duration. Playlist 1 has a duration of 1:26:25 and playlist 2's duration is 0:38:58. On the back of the Blu-ray's sleeve, it says the running time is approximately 134 minutes. This running time is almost always for the main feature, but it doesn't seem to apply in this case. They must be referring to the total cumulative duration of the concert and all the bonus features. For this example, I've picked playlist 1 because it is the longest. Playlist 1 also has more high resolution audio tracks to choose from including the stereo RAW/PCM and multi-channel DTS-HD MA.

I've also entered the path and default filename for the output files under the 'Output File' section.The source audio/video streams are listed under the 'Source Stream Files' section. When you pick one of the streams (in this case only one stream is listed), it will automatically start playing in the preview window if you have "Play when selected" checked. You can preview the stream to also make sure you're picking the correct title or playlist.
To start the ripping process, I pick the 'Command Line' button. First, it analyzes the playlist and displays another window. The top section shows the commands that will run 'eac3to.exe' from a command line and the bottom section is a list of options that you can apply to 'eac3to.exe'.
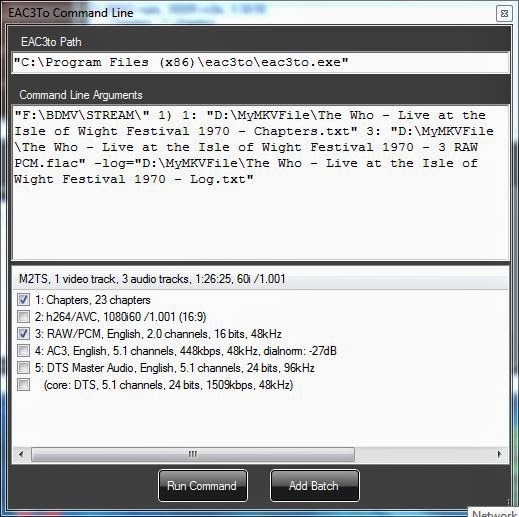
As you can see, it has created an 'eac3to.exe' command with arguments for extracting the chapters and the RAW/PCM audio tracks. This Blu-ray doesn't include subtitles, so that isn't listed. There are a bunch of components that 'Another EAC3toGUI' didn't pick, including the h264/AVC video track and the DTS Master multi-channel audio track. Normally, it chooses the highest quality audio and video tracks by default. For some strange reason, 'Another EAC3toGUI' doesn't like interlaced video. As you can see above, the video track is listed as 1080i60. The "i" means it is interlaced. The highest quality audio track is the least compressed format and in this case that's the uncompressed RAW/PCM. Actually, since the DTS Master Audio is lossless, its quality is the same as the uncompressed PCM, but that's the choice this program makes by default. I would like both, so I'm going to pick the checkbox for '5: DTS Master Audio, English, 5.1 channels, 24 bits, 96kHz'. I also want the video track, so I'll pick '2: h264/AVC, 1080i60/1.001 (16:9). Since I don't want any of the other components, I'll leave them unchecked. Before picking the 'Run Command' button, I can review the 'eac3to.exe' command arguments. Normally, I'd just run the command, but I know from experience that the current settings won't work.
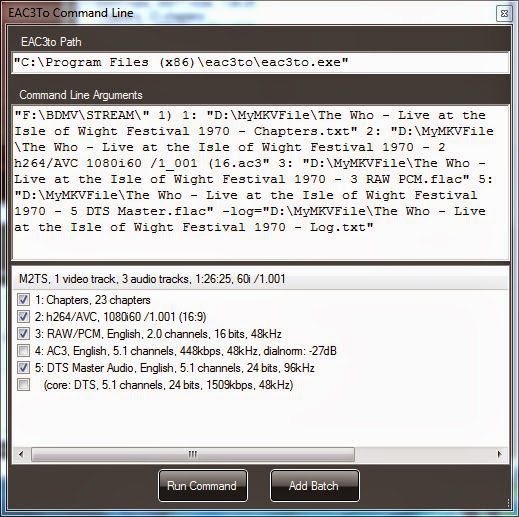
The command line part after 2: doesn't make any sense to 'eac3to.exe'  and it will just make the program end in error. For some reason it seems to misinterpret the "(16:9)" part and it changes it to "(16.ac3", so I've edited it to an argument that will work. I've simply deleted everything past 1080i60 and replaced with ".mkv", which will put this video track into a temporary MKV container.

Now, I'm ready, so I can pick "Run Command." This will activate a command window and you can see 'eac3to.exe' do its job.
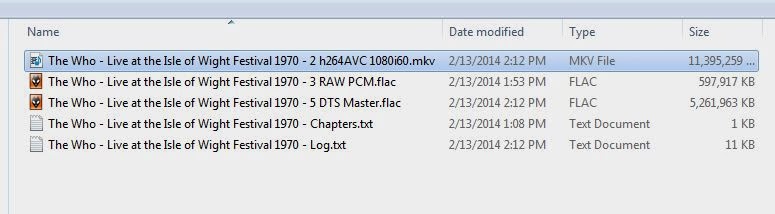
The resulting four files (a chapter file, the video file, a stereo PCM audio file, which will be converted to stereo FLAC, and a multichannel FLAC audio file from the DTS Master Audio track) will be stored in the folder I've chosen for the output. In this case, that's a folder I've named "MyMKVFile."
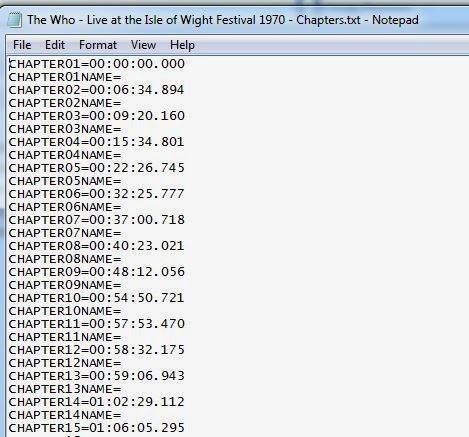
I have everything I need to create the concert video MKV and surround sound and stereo albums for my music library. First, I'm going to generate the audio albums. The FLAC files I have are audio of the whole concert. I would like to split them into individual tracks for each song. To accomplish this, I'm going to create a CUE file, which I can use to split the audio into separate files. A CUE file, is a metadata file which describes how the tracks of a CD are laid out and are stored as plain text files and commonly have a ".cue" filename extension. All I need is the start time information in the chapter file and the song titles listed on the back of the Blu-ray's sleeve. The number of chapters in the chapter file match the number of songs listed on the sleeve. Here's a snippet of the chapter file. To create the CUE file, I use a template, with the basic format, instead of starting from scratch. Here's a portion of my edited CUE file:
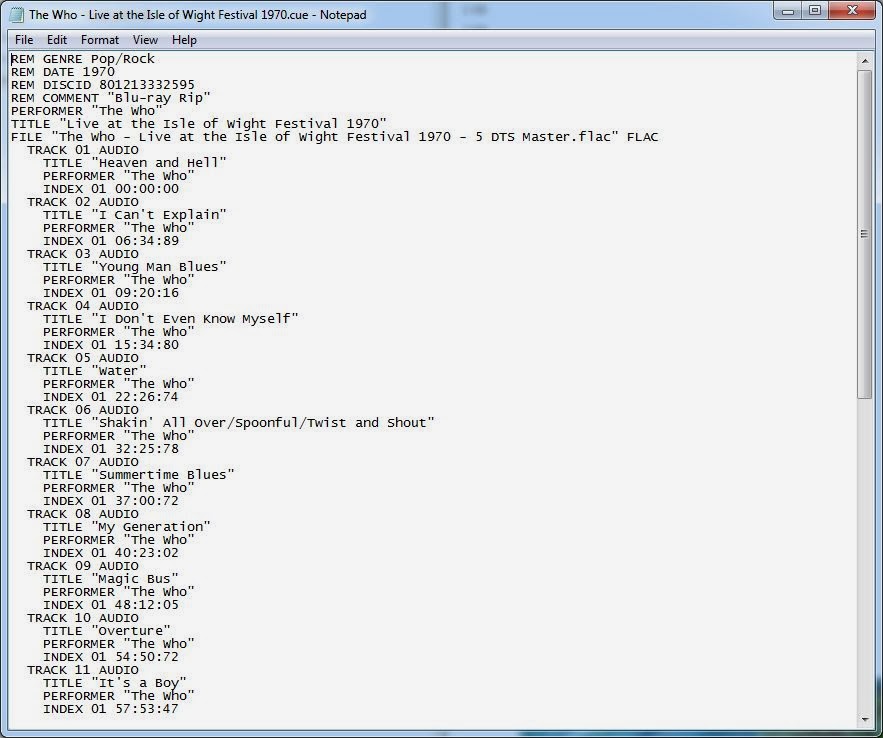
I've used the times from the chapter file for the start times of each track. The format for time is a little different in the chapter file and the CUE file. The chapter file uses HH:MM:SS.xxx and the CUE file use MM:SS:xx (where xx or xxx is fractions of the second). So for a chapter that starts at 01:06:05.295, I wrote 66:05:29 for the track start in the CUE file. You can test your CUE file with any program that can read them. I usually use foobar2000 because it's quick and easy. After right clicking the CUE and picking 'Open with foobar2000' I can see if it worked and I can test each track to verify that I've got the right times and track titles.

Using foobar's convert tool, I'm going to generate individual tracks from the big FLAC file identified in my CUE file. I have the convert utility set to convert to FLAC, so basically all it will do is create the 23 individual tracks. You can also accomplish this with other programs like JRMC. Once I've generated all my tracks for the FLAC file that was originally multichannel DTS-HD MA, I can repeat this process for the stereo RAW/PCM tracks. All I have to do is edit the CUE file and change the designated file so it uses the RAW PCM file instead of the DTS Master file.
I now have the individual audio tracks, both stereo and surround, and I can move them to my media server and import them into my JRMC music library. This Blu-ray also included some bonus material. I can use 'Another EAC3to GUI' to select the 2nd playlist where these bonus tracks were stored and then run through this process again.

Now that I have my audio albums, I can create my concert movie. The original full length audio tracks are still intact because foobar2000 did not delete the original files when it generated the files for each songs. So this brings us to the second part of the manual ripping method. I need to merge everything together into a concert movie, so I have a single MKV file of the audio and video. For this, I am using a program called 'mkvmerge GUI'. MKVmerge is the program 'Another AEC3to' uses to merge everything together during it's automated process. I am using a version of this with a nice graphical user interface (GUI). MKVmerge is part of MKVToolNix, which is a set of utilities for MKV files.
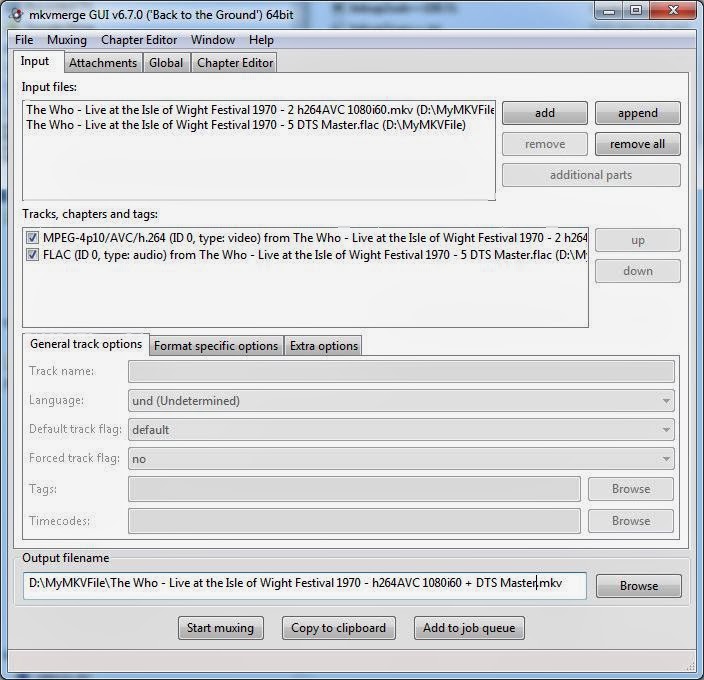
I've picked the 'add' button to add my audio and video files to the 'Input files' list. Using Windows Explorer you can also drag and drop these files into the 'Input files' section. As you can see above, I'm only including the multichannel FLAC file that was originally DTS-HD MA, but I could include the stereo PCM audio if I wanted both audio tracks. I don't, so I've only added the multichannel track. Next, I'm going to add the chapter file, so I can navigate from song to song (chapters) when I play the MKV with the software players on my computer. To do this, I've selected the 'Global' tab and browsed to and selected the chapter that was created with 'Another EAC3toGUI'. Before selecting the chapter file, I edited it using notepad and added the names of the songs to each chapter. The 'mkvmerge GUI' program also has a utility for editing your chapter names. Sometimes I use it to double check that I've got everything correct. To check your chapter titles, select the 'Chapter Editor' tab and drag and drop your chapter.txt file into the editor window.
I could have used this editor instead of notepad, but I think notepad's a little faster.
I can now merge everything into a single MKV file now that I've got the audio, video and chapter files selected and the output filename set to the location and desired name. Now I just pick the 'Start muxing' button and wait for it to finish.

It will take about 30 minutes to generate my merged MKV file. When it's finished, I can move this file to my media server and use 'My Movies', JRMC and/or WMC to add it to my movie library.

Here are the links to the programs I've used during the manual method:
Another EAC3toGUI-Plus info. This info page includes links to all the other utilities 'Another EAC3toGUI' needs to work. This site may also provide more details than I have in this article. It should cover features that I haven't used here. Mike Eby, the author of 'AnotherEAC3toGUI, also provides a link to a user guide written by a guy named Damien called "MKV Mania: Another EAC3to GUI." Damien also provides links to everything you need.
MKVToolNix is the set of tools you'll need to work with MKV files, including 'MKVmerge GUI'.


2. Automated Blu-ray Ripping
Now for the easy method...

Buy MakeMKV. And NO, I don't work for them. Actually, I think they have a trial period, so you can test it before you spend any money. I think the trial is fully functioning. This is the program I use for ripping my Blu-rays most of the time. In the case of concert Blu-rays, I may use the manual method described above to get my audio tracks and then use MakeMKV to extract and create my concert movie.

MakeMKV works out of the box, you don't need to download a bunch of other utilities to get it to work. You don't even need a disc decrypter like 'AnyDVD HD'. In fact, if you have it running, MakeMKV will suggest disabling it before proceeding.

For this example, I'm going to rip the disc from my "Sherlock Holmes - A Game of Shadows" Blu-ray. After inserting the disc in my BD drive, I've launched MakeMKV:
First, I make sure it is set to my BD drive and then I pick the Blu-ray icon near the middle of the screen. The program analyzes the disc and displays a list of all the titles.
The results show there are quite a few titles. Normally, with most movies, it's pretty obvious which title is the main feature. It's usually the largest sized title. With TV series discs, it's not quite as easy. Unfortunately, MakeMKV doesn't have any way to preview these titles. In this case one of the titles is identified as the main feature (that's not necessarily the case with all Blu-rays), so I'm going to deselect the other titles since I only want to create one MKV movie file. I've clicked on the little triangular icon to expand the tree. This will show all the components included with the titles, such as the audio tracks and subtitles.
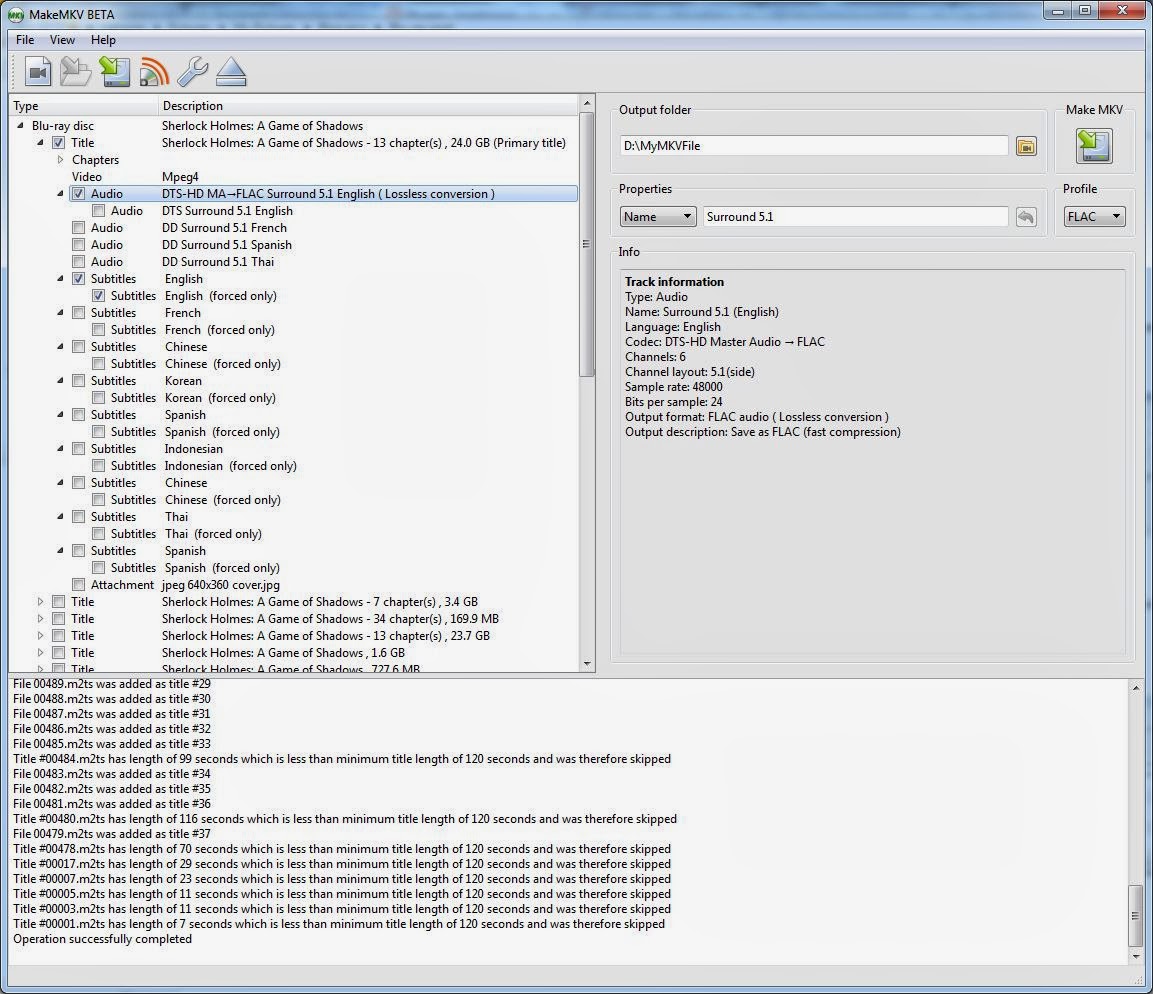
I've removed the checkbox from everything except the high resolution DTS-HD MA track and the English subtitles. I've selected both the English subtitles and the English forced subtitles. By checking the 'forced only' branch, it will only included the forced subtitles. Normally I don't want all the subtitles of an English movie. However, some English movies will have foreign dialog, like the movie "Argo," and with forced only checked I will get subtitles when they are speaking Farsi. You can also see that the DTS-HD MA track is going to be converted to FLAC. That's because I'm using the FLAC profile. If I change the profile to 'Default' it will not convert the DTS-HD MA track and both the audio and video will be in their original formats. Once all my programs, JRMC, MPC-HC and WMC were capable of using the LAV filters, I've been able to play the original DTS-HD MA tracks.  So I really don't need to use the FLAC profile. Next, I'm going to pick the 'Make MKV' button to rip and generate my MKV movie.
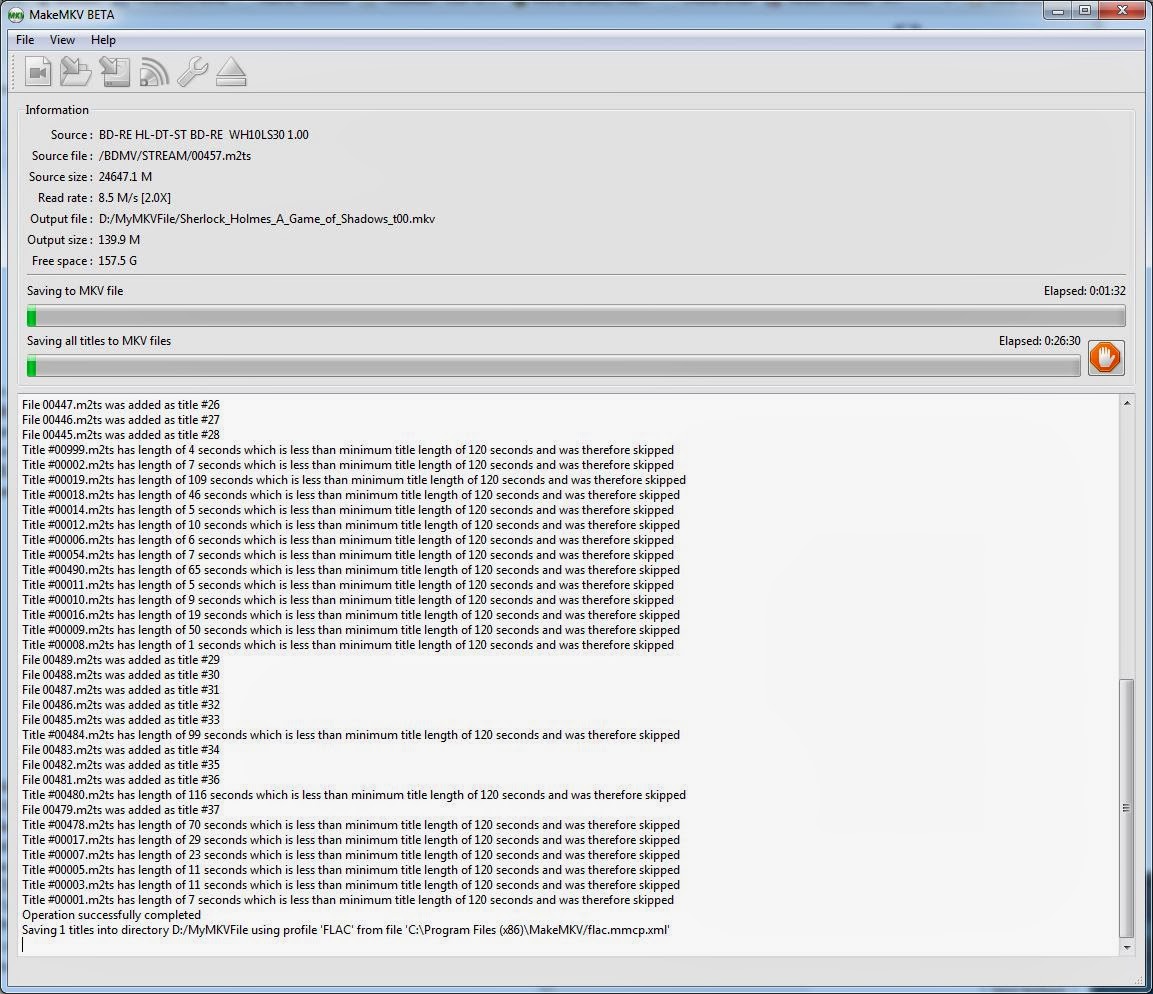
That's it! After about 30 or 45 minutes, I'll have my MKV file and I can move it to my server and add it to my movie library. As you can see, that's a much simpler method than the manual method described above. However, you can't extract just the audio by itself. MakeMKV will only create a complete A/V movie file. You could open the resulting MKV file with 'MKVExtractGUI2', which is one of the tools included with MKVToolNix. Then you could extract the audio and chapter files, and follow the steps in the manual method above for creating the cue file and splitting out the tracks.

Tuesday, February 11, 2014

Playing and Ripping SACDs with your PC

Note: I started writing this post back in August of 2012. I just never got around to publishing it at the time. I start by providing a little background information and end with what I think is the latest and best method. However, I haven't checked for newer versions or methods for well over a year, so there might be better methods out there. Please leave a comment if you know if there's a better method.

I've wanted to rip and play SACDs with my computer for a long time. Since I didn't own a dedicated SACD or even universal CD/DVD/SACD player, I hadn't been able to play a SACD disc until recently. As far as I know, the sound quality from a SACD is very similar to DVD-Audio, but there seems to be a lot more content available on SACD, so the ability to play the tracks from a SACD disc became one of my goals. Since I store my music on my media server and stream it via several PCs attached to my home network, I prefer to rip all my content off the discs. I don't want to purchase another piece of hardware and add to the chain of equipment to play another format. Maybe this is another sign that I'm getting old. When I was a teen, I thought having a rack of hardware with lots of flashing LEDs was pretty cool, not so much now. Besides, I think more components added to a very good audio system can compromise the overall sound quality.

A few years ago (I don't know the exact time frame or dates) some very technically savvy people started working on ripping SACDs. Unlike ripping normal DVDs and CDs, this seemed impossible. You couldn't purchase a SACD drive for your PC and even though it turns out a SACD drive is really a DVD drive with different firmware that allows it to read the DSD data format, you couldn't just replace the DVD's firmware to make it work with SACDs. The best you could do was record the analog audio output from a SACD player into your computer using a soundcard with analog inputs. With a high quality professional soundcard or audio interface, you could get pretty good results. So someone with a multichannel device with decent ADCs (analog-to-digital converter) could connect the analog inputs of their multichannel interface to the analog outputs of their SACD player. The resulting 24-bit/96KHz or higher resolution tracks sounded pretty good. In my opinion, these were a step above a meticulously ripped vinyl recording. However, they still needed an analog-to-digital conversion step. And depending on your SACD player, they might already have gone through another conversion step from DSD to PCM. If they used a mediocre SACD player, the results were not so great, so you also needed a pretty high end player.

Maybe I should back up a bit and try to explain the difference between DSD and PCM. Forget it... that's not important here. If you want to know more about this, just read the Wikipedia article. This article also includes links to Sony technical documents and other FAQs.

Even though the analog rips of the SACD were pretty good, these technically savvy folks continued working on ways to digitally rip their SACDs. Their goal was to generate a track without going through the analog-to-digital step. Sometime around the middle to end of 2009, a person with the pseudonym "HiResOrNothing" explained how they developed their new "standard" for SACD ripping:

"We can now capture a pure 24-bit PCM digital signal which is converted directly from the pure DSD stream from the disc - and this is achieved by using a special "modified" SACD player. These modified players have been around ever since the SACD format has, but they have always been extremely expensive (like, try a $2000 Denon player which you have to order from Switzerland). But things have progressed and a few companies are offering a modified version of the famous Oppo DV-980H player, which is well known for its affordability yet uncompromised quality - especially with regards to digital SACD output!"
"I have purchased such a player. The Oppo offers pure DSD output over HDMI 1.2 and  it also gives the option for PCM output. The Oppo internally converts the DSD to PCM at 24-bit/88.2kHz and the "mod" captures this PCM signal and outputs it through three stereo S/PDIF (coaxial) jacks. To capture this glorious digital signal, I am using three M-Audio Delta 1010LT sound cards simultaneously. They each have a single stereo coaxial input, so in order to record all six channels simultaneously, three cards must be used. I'm using Adobe Audition 1.5 in multitrack mode to simultaneously record the 6 channels in real time, then I map the channels with Audition's "multichannel encoder", and export the individual mono wav channels. After that I split the album into the tracks and encode it to MLP with surcode, and author it to DVD-A with Discwelder Chrome. No editing of the audio signal is made in Adobe Audition, this is a straight digital capture of the signal and as close as you can get to copying a SACD disc-to-disc at the present time."
So if you come across a SACD rip and find it offered as 24-bit/96KHz tracks, there's a good chance it's an analog rip. If you find 24-bit/88.2KHz tracks, it's probably a digital rip. Maybe some of the commercial high resolution download sites, like HDTracks, are using a similar digital rip technique for some of their 24-bit/88.2KHz offerings. I think I've seen some 88.2KHz tracks there.

The next goal was to figure out a way to rip and play back the DSD format files. This would be the ideal method for listening to your SACD generated files on your computer or home network. However, to get the full benefits, you'd need a DSD capable DAC and a software player that can handle the DSD format. Most DACs (and as mentioned earlier in this post, many universal/SACD players), mine included, that say they are DSD capable actually convert the DSD to PCM internally before outputting the analog signal. Some, like the ESS Sabre32 DACs, I believe can convert to analog without the intermediate PCM step. When you listen to one of these DACs, you're listening to the DSD format. I personally don't have very much experience with this because I don't have a ESS Sabre32 DAC, so I don't know how different the pure DSD sounds compared to the sound of PCM after converted from DSD. Here's a post with an opinion on this subject. Fortunately, my favorite software player, J.River Media Center, can handle the DSD format, so I'm all set there.

Moving forward, early 2012, someone finally figured out how to rip and save the DSD formated file from a SACD and published "Ted's SACD Ripping (and PCM Conversion - optional) Primer - Version 2.0.4." I think the latest version of this primer is 2.3.2, but I can't find it anywhere. Maybe ask Ted, whoever he is. This method describes basically a two step process. First, you use a Sony PS3 to save a disc copy of the SACD to an ISO file. Second, after copying the ISO file to your computer, you use a program to extract the DSD from the ISO and save each track as DSF files.

The first part only works with a Sony PS3 that can play SACD discs. Before you can do anything, the firmware has to be hacked to support ripping. This will only work if the PS3 player has the firmware 3.55 or older. Apparently, there are only 4 PS3 models with this capability. If you can find one of these (good luck), then you have to hack the player. Hacking the firmware involves installing a revised version of the firmware. Once the new revised firmware is running, you can install the SACD ripping software. Once you have a hacked PS3 with the SACD ripping software installed, you can start ripping your SACD collection. Older versions of the ripping program could extract individual files or an ISO disc image. Because of slow ripping speeds and to avoid wear and tear on the PS3's optical drive, they recommend extracting the full ISO image and thus newer versions of the ripping software only supports ISO extraction. To rip a SACD disc, you use your game controller to navigate to the games section of your PS3 menu, then pick "Unknown" and then "SACD-ripper". Next, you insert your SACD into the PS3's optical drive and a USB thumb drive, with enough storage space, into one of the USB ports. After picking "OK" ("X" button), it will start ripping and eventually store the ISO file on your thumb drive. Personally, I've never done this, because I don't own a PS3 player. However, I was lucky to find a friend who owned one and was willing to run the hack. Now I buy the SACD discs and send them to him and he creates the ISO files for me. For ISO files smaller than 2 GB, he can transfer them over the Internet using a service called We Transfer. If it's larger, which it usually is, he'll burn it to a DVD-R disc and send it in the mail. I wish I could find a compatible PS3 player, but they are almost impossible to find. Maybe more will show up on eBay now that the PS4 is shipping.

The second part involves running another SACD extraction program on your PC. First, you have to install 'sacd_extract.exe' on your computer. Here are the steps I follow to extract the DSF files for each track:

  1. Copy the ISO from my thumb drive (or DVD-R) to the same folder where sacd_extract.exe is located on my PC, which I'll call the rip folder.
  2.  navigate to the rip folder and SHIFT-right click on the folder and select "open command window here."
  3. at the command prompt, type "sacd_extract" (without the quotes), followed by the arguments you want to apply to the output files. 
The command format is: sacd_extract [options] [sourcefile]. I always generate DSF files and depending on the SACD, I can generate stereo and/or multichannel surround files, if they exist. For example, I have Bob Dylan's 'Blood on the Tracks' SACD, which has both stereo and multichannel surround tracks. Assume the ISO from the PS3 rip is 'BloodontheTracks.iso'. To extract the stereo tracks, I typed:

sacd_extract -2 -s -c -i"BloodontheTracks.iso"

if I want the multichannel surround tracks, I type:

sacd_extract -m -s -c -i"BloodontheTracks.iso"

These will create a new folder named 'Bob Dylan - Blood On The Tracks' with each individual track in the format 'tracknumber - trackname.dsf' (for the first track, this would be "01 - Tangled Up in Blue.dsf"). It will create exactly the same names for both the stereo and multichannel, so if I want both, I will rename the folder to something else to avoid overwriting the stereo with the multichannel tracks. Then I move the folders to my networked server and add it to my music library using JRMC v19 (J.River Media Center). I chose DSF files because they can be tagged with metadata. So when I add them to my library, I make sure all the tags are correct.


That's it!! Now I can enjoy listening to my SACDs using my computers and my media server. Again, I don't have a DSD capable DAC, so even though JRMC19 can handle the DSF file format, it automatically converts to PCM before it is sent to my DAC. So I'm still not listening to the pure DSD format, but it still sounds really good. And when or if I ever get a DSD capable DAC, I have these in the correct format and I'll be able to listen to them without the PCM conversion.

Thursday, May 17, 2012

Ripping DVD-Audio with DVD Audio Extractor

In an earlier post I explained how to rip a DVD-Audio disc using foobar2000 and a couple foobar plug-ins. In this post I'll explain a slightly easier method using a program called DVD Audio Extractor.

DVD Audio Extractor is an application that I originally used to extract the audio tracks from a video DVD. Also in an earlier post, I explained how to extract the audio from a Diana Krall DVD. You use the same technique to get the audio from a DVD-Audio disc. The application works like a wizard and steps you through the process.

I'm working with DVD Audio Extractor version 6.3.0, which is the most current version at this time (May/2012). Here's what the first screen looks like:

Before I launched DVD Audio Extractor, I already had the DVD disc in my drive and by default, it displayed the contents of the AUDIO_TS folder. You can use the drop-down navigation tools to get to the VIDEO_TS folder. The volume label is shown in the album field. In this case, it says BARENAKEDEVERYTHING, which is the volume label for my 'Barenaked Ladies - Everything to Everyone' disc. The DVD was part of a CD/DVD combo pack I bought many years ago. The DVD disc also includes a DVD Video with in-studio video clips of 11 acoustic songs.

First, let me explain the program's layout. It should be pretty self explanatory, so I'll just provide a simple overview.  Below the source selection drop-down is a row for entering the metadata, which includes the artist, album, year and genre. Below that, there are 2 windows. The one on the left is a list of titles included in the disc. On the right are all the chapters in that title. When you pick on one of the titles, the message box below the title window will show the audio format usually with sample rate, bit depth and the number of channels. With this disc, there are 5 titles, 2 of these have 14 chapters, 2 have 1 chapter and 1 title has 11 chapters. I can see that the titles with 14 chapters (Title1 and Title2), all of their chapter lengths match, so they're probably the same songs. The difference is Title1 has 6 channel tracks (5.1 surround) and Title2 is in stereo. It looks like Title3 and Title4 are the 5.1 channel and stereo versions of a bonus track and Title5 is the same 11 acoustic songs from their studio session that are offered in the VIDEO_TS folder. I'm going to extract the surround tracks from Title1 and Title3. These are all 24-bit, 96 KHz, 6 channel tracks.

First, I'll need to enter the metadata. I tried picking the pencil icon on the far right side of the metadata toolbar to see if I could automatically download the information for artist, album and track names, but it returned "no match found" so unfortunately, I'll have to enter this in manually. So using the info on the back of the jewel box, this is what it looks like after editing.

After entering the artist, album, year, genre and track names, I'm ready to go to the next step, so I picked the 'Next >' button at the bottom of the app's window. The program displays a message saying "Scanning chapters, please wait..." Hmmm, this is taking quite a long time and my computer has a Intel Core i3 540 (3 GHz quad core) and 4 GB RAM running Windows 7 Ultimate 64-bit. This step didn't take very long with a video DVD, but it is pretty slow with this disc.

The second screen includes the output format and codec options. For this disc, I'm going to convert (transcode) the MLP tracks to FLAC. Since both are lossless, they will sound identical and FLAC has the added advantage of being supported by virtually every player and it supports tagging, which I'm not sure is possible with MLP. Since I want to convert from MLP to FLAC without any changes, I set the sample rate to "same as input", the channels to "all 6 channels" and bits per sample to "24 bits", which matches the bit depth of the original MLP.

Picking the 'Next >' button again will take us to the next screen, which is used to specify the location for your files. It can automatically create folders using the metadata fields I completed in the first screen. I'm going to use the metadata from 'Artist' and 'Album' to create an artist folder and an album subfolder. Each track will be placed in the album folder and the names will have the track number followed by the track name. With DVD Audio Extractor the track number comes from the INDEX data and the track name is the same as the CHAPTER name. This information was included in their help file, which you can see if you pick the 'HELP' button in the lower left corner. Since I am not making any changes, other than the basic conversion from MLP to FLAC, I will not do any normalization.

Picking 'Next>' takes us to our final step, which shows the progress of extracting and encoding. I picked the 'Start' button to make it run. This screen shows a snapshot of what it looks like while in the process of extracting and encoding. Upon completion, DVD Audio Extractor will pop-up a message to tell you the encoding finished with a link to the folder where your extracted tracks are located. That's it!

In conclusion, DVD Audio Extractor works and it's an easier method than the process I explained for extracting DVD-Audio tracks using foobar2000. However, I think foobar2000, once set up with the correct plug-ins, is pretty easy and is a lot faster. I waited at least 15 minutes between the first and second steps with DVD Audio Extractor.

Friday, January 29, 2010

Playing HDCD in Full Resolution

Do you recognize this logo on the left? You may see it on the back cover of some of your CDs. This means your CD has High Definition Compatible Digital (or HDCD) information encoded in the disc. HDCD is an encode-decode process that improves the sound quality of HDCD-encoded CDs. If you play the HDCD disc in a CD player that includes the HDCD decoder, the audio is played back at 20-bit 44.1kHz. These CDs are also backward compatible with a regular CD that uses the standard Redbook CD specification (which is any CD that will play in a CD player). So when you play an HDCD disc in a regular CD player, it plays just like any other CD at 16-bit 44.1kHz.

I'm not sure exactly why these discs sound better. According to the wikipedia article for HDCD, it could be due to the mastering engineers taking advantage of 4 more bits of dynamic range and digital interpolation filtering which results in a more natural, open, and accurate sound reproduction. I think the engineers that take advantage of HDCD are probably more careful when mastering, use less compression, and are concerned about overall sound quality, just like they are when mastering for vinyl, SACD or DVD-Audio.

The only way to take advantage of HDCD with a PC was to play the physical disc with Windows Media Player. Microsoft actually bought the developer of HDCD technology, Pacific Microsonics, and all their intellectual property, in 2000. If you ripped your HDCD disc to your computer's hard drive (or media server), the audio would not play back at the higher resolution. It would just play back as a regular 16-bit 44.1kHz CD.

I recently discovered that you could use a combination of tools to convert HDCD encoded audio files into a higher resolution and take advantage of the higher quality recordings. It's important that your ripped CDs are exactly the same as the original CD. If they are compressed using a lossy format like MP3, this will not work. If you use lossless compression like FLAC or lossless WMA, it should work. One method is to use the custom little decoder program 'hdcd.exe'. This little tool will input the 16-bit WAV data and if it finds the embedded HDCD info, it will upconvert it to 24-bits. The last 4 bits of this 24-bit file are empty, so your DAC just sees it as a 20-bit file. For more information on how to use this command line utility read this thread at Doom9's forum. Apparently it will still work with non-HDCD encoded files, but the volume will be cut in half. So maybe this isn't the best method. Or, supposedly there's a way to check if the file is HDCD encoded using hdcd.exe in test mode. So it's probably a good idea to check if the file is HDCD encoded first.

Another method, which I believe is a lot more convenient, is to use dBpoweramp. Using dBpoweramp's conversion utility, you can activate their HDCD plugin, which automatically detects HDCD encoded files and decodes to 24-bit. If the file is from a non-HDCD audio CD, it is left as 16-bit. Again, it will only work if the file is exactly the same as the original HDCD encoded CD. So it had to have been ripped to uncompressed WAV or losslessly compressed FLAC, lossless WMA, etc., etc. When you convert the file just use the same encoding method (I usually just use FLAC) and overwrite the original file.

You can now play your decoded 24-bit 44.1kHz audio file on your PC with any software player. Now, all you have to do is dig through you CD collection and check the back of the disc for the HDCD logo and go to work. If these CDs have already been ripped, then use the dBpoweramp converter to decode them to the higher resolution. Some HDCD encoded discs do not have the logo printed on their back cover, but still include this capability. You could always use dBpoweramp to test if they have HDCD, but that might take a lot of time. You can also search the web for a list of HDCD encoded CDs. I was able to find this list on Head-Fi's forum. So before you dig through all your CDs, you might want to check to see what's on the list. I plan to convert all my HDCD encoded CDs to 24-bit when I get the chance.

Sunday, January 17, 2010

Free DVD-A Album

In my last post I explained how you can play and rip a DVD-A with your computer. Some of you may not have a DVD-A, so I found one you can use to try this out.

Check out Diatonis - Dark Edges, an ambient style electronica album. The download link is for a DVD-A ISO image of their 24-bit 96 kHz 5.1 surround sound recording. Diatonis also sells DVD ISO images (both DVD-Video and DVD-Audio) through tradebit for only US$6.00 per album.

After you download the ISO, you can use foobar2000 with the dvd-audio plugin described in my last post to both play and rip the tracks. The method described below works on both physical discs and ISO images. If you have any questions, just post a comment below.

Enjoy!!

Thursday, January 14, 2010

Playing and Ripping DVD-Audio With Your PC

DVD-Audio, or DVD-A, was one of the audio formats that was suppose to replace CDs. The other was SACD. Both of these formats are a big improvement in audio quality. Not that redbook CD is a bad format. It actually is quite good when done right. DVD-A supports higher resolution and more channels than CD, which as you know only gives you 2 channels for stereo playback. DVD-A can have up to 6 channels for surround sound. The DVD-A spec supports a bit depth of up to 24-bits and a sampling rate of up to 192 KHz for 2 channels and 96 KHz for more than 2 up to 6 channels. As you also probably know, DVD-Video, or DVD-V, also supports up to 6 channels of audio. The big difference between DVD-A and DVD-V for audio is the multichannel audio in a DVD-V is compressed using lossy compression methods like Dolby Digital (AC3) or DTS. The multichannel audio in a DVD-A uses a lossless compression method called Meridian Lossless Packing. DVD-A can also use uncompressed LPCM, but it can only handle a total bit rate of 9.6 Megabits/second. So high bit rate, high sampling rate multichannel files need to be compressed. Anyhow, MLP's lossless compression sounds exactly like the uncompressed LPCM, so there's no disadvantage to it. The MLPs will sound better than the same music compressed with Dolby Digital or DTS, so therefore it is a better choice for audiophile recordings.

I think DVD-A and SACD failed to become the next big mass market format for several reasons. The fact that they were competing formats didn't help and probably created some confusion. New hardware requirements probably kept some people from jumping in before knowing what format to buy, especially since they didn't want to make a mistake and buy equipment that may become obsolete (like Beta VCRs or HD-DVD players more recently). Another factor that may have impeded the growth in popularity for DVD-A might be the copy protection that prevented people from copying the music to their computers. At the time the DVD-A spec was completed in 1999, MP3s were becoming very popular and file sharing with Napster was increasing very rapidly. I think the last thing the record labels wanted was another format that was easy to copy. Consumers on the other hand wanted to copy freely. I'm not sure if this was a big deal because the size of a high resolution multichannel file is huge and wasn't very practical for filesharing.

The fact that there's not much music (or at least really popular) music on DVD-A doesn't help either. The big record labels weren't really releasing a lot of stuff on DVD-A. However there is some stuff from a few of the labels like Universal Music, EMI, and Warner Bros. Records, along with a few smaller audiophile labels like AIX Records and DTS Entertainment. Some of the DVD-A releases are older standard definition recordings that have been upsampled and remixed into 5.1 surround sound. I would assume a lot of the newer released music is not upsampled. Originally DVD-As were pretty expensive, but now you can find them for nearly the same price as CDs.

To many people surround sound is just a weird gimmick. Originally, it seemed the audio engineers didn't really know how to deal with it. Some mixed the audio so the listener was in the center of a room of performers and others tried to create a more traditional experience with the music coming from the front speakers and ambient sounds from the rear. This was suppose to sound more like a live performance. As far as I'm concerned, both of them work fine when mixed by an engineer that knows what he/she is doing. I guess it just depends on what effect the musicians want us to hear. I think surround sound gives a more accurate sound stage than can be achieved with just 2 loudspeakers. So I don't think it's a gimmick. I'm sure there's the possibility of someone mixing a surround recording that may just be annoying, but that was the case with some early stereo recordings. If you are really interested in the advantages of multichannel surround, you should check out ambisonics.net.

Enough of the background info... I have a couple DVD-A discs. Actually, I bought CDs that also included a DVD with the overall bundle. The DVD-Video disc portion included some in-studio videos and the DVD-Audio portion included the album mastered in high resolution 5.1 surround. Up until recently I haven't been able to play the DVD-A portion. First, I don't own a DVD-A player. Second, I don't own a Creative Labs soundcard, which was the only product that was bundled with a player that could play DVD-A discs. Now I can play the DVD-A discs on my computer without the Creative Labs soundcard using our prototype technology. However, the method I use will probably work with a lot of hardware. So here's how I did it:

The software application I used is foobar2000. You can download the current version here, which is version 1.0 as of 1/9/2010. Like a lot of open source projects, foobar2000 has been a fractional number release or in beta for a long time. Foobar2000 is an excellent audio player and fairly popular with people that want the best sound quality from their PC. However, it's not the prettiest or most user-friendly application and doesn't have some of the advanced capabilities of a few commercial players like J.River's Media Center. JRMC can't do many things that you can do with foobar2000. That's why I have both. When you install foobar2000, by default it will locate its files in your 'Program Files' folder. I run Win7 64-bit, so foobar2000 is located in my 'Program Files (x86)' folder.

Foobar2000 by itself won't play the DVD-A, for this you need the DVD-Audio Decoder and Watermark Detector input plugin for foobar2000. Download foo_input_dvda-0.3.4.zip (or a newer version if it is available when you read this) and unzip to your system. Inside the zip file (and now the unzipped folder) you should find a file named 'foo_input_dvda.dll'. Copy or move this file to the foobar2000 components folder. This is a folder located inside the '\Program Files\foobar2000\' folder called 'components'.

Before you run foobar2000 and try playing a DVD-A, make sure you aren't running the CSS protection from DVD-Videos, like AnyDVD or AnyDVD HD. These programs ignore DVD-Audio CPPM protection, but somehow confuse the drive into behaving like protection is missing. I'm not sure exactly why this is, but just understand that you'll need to disable programs like AnyDVD before this will work. Also realize that if you like to copy DVD disc images to your computer or server using AnyDVD, it won't work with DVD-A discs. They'll copy okay, but AnyDVD doesn't remove the CPPM protection and the resulting ISO disc image won't play. You need a program like DVDFab, which can handle DVD-A. For this example we aren't going to copy the ISO disc image, so DVDFab isn't needed. Just remember that you still need to disable AnyDVD.

Go ahead and start foobar2000. I don't remember exactly what happens the first time you run it, but at this time just accept the defaults. For the user interface settings, I think I settled on 'Album List + Properties (tabbed)' for the main layout, with colors set to 'Forum' and the default playlist layout.

Next, insert your DVD-A into your DVD drive and wait a few moments for your system to read the disc. Then in foobar2000, use the 'File->Open' command to select your DVD-A file. You'll need to navigate to the disc's 'AUDIO_TS' folder. It should look something like this:


As you can see there's a bunch of files with the extension AOB and one with IFO. It's hard to tell what tracks are included in each AOB, so I just chose the IFO file and it brings up everything.

In the example above, each track on the DVD-A is listed. Some are six channel and some are 2 channel. The track title shows the number of channels, the bit depth and sample rate. In this case 'Lf-Rf-Ls-Rs 24/96000 + C-LFE 24/96000' means it includes the left-front channel, the right-front channel, the left-surround channel, the right-surround channel at 24-bit and 96 KHZ plus the center and LFE (low frequency effects or subwoofer) channel.

When foobar2000 opens a file, it will immediately start playing the first track. Which it did in my case. Now you are playing the DVD's MLP files with your computer without any downsampling or conversions. As you can see, it doesn't use a database lookup service like freedb to provide the metadata tags for artist name, album, track name, etc. So you will have to enter this information manually. You can go ahead and edit all the metadata or track info to display the correct tags and the program will save the data and display it the next time you open and play your DVD-A. A good source for album info is allmusic.com. They include lots of info you can't find in the CD or DVD's jewel case. After you've edited the track info, it's automatically saved in a dvda_metabase subfolder in *.xml files. This folder is located in 'C:\Users\your-user-name\Application Data\foobar2000' (for Vista\Windows 7) or 'C:\Documents and Settings\your-user-name\Application Data\foobar2000' (for Windows XP) and the author of the plugin would like you to share it. This way other people with the same DVD-A won't have to manually input track info. All you have to do is send the new version of your .xml file (you can probably identify it by the time stamp) and send it to maxim.anisiutkin@gmail.com. In case somebody has already entered the data for your DVD-A and you'd like to take advantage of this shared info, you can download the latest dvda_metabase_XXXX.XX.XX.zip file from http://dvdadecoder.sourceforge.net site. Just unzip the .xml files and move them into your dvda_metabase folder.

Now that you can play your high resolution, multichannel tracks from your DVD-A with your PC, you might be interested in some adjustments you can make to take full advantage of your audio system. Many surround sound systems may have a combination of satellite speakers, full-range speakers and subwoofers. My surround system is made up of 4 Era D5 satellites, 1 ERA D5 LCR and an Era Sub10 subwoofer. The D5s have a pretty good frequency range for bookshelf sized speakers, but they still need a little help below 60 Hz. My big 3-way towers reproduce the bass much better. With bass management software you can redirect audio below a specified frequency to the subwoofer channel. This will substitute the bass missing from the satellites and redirect the bass to the sub. Since low frequencies are non-directional, it should sound just as good as if you had full range speakers. This also depends on the quality of your sub. In my case, the Era Sub10 subwoofer is very good. Some audio drivers may include some bass management features. Microsoft introduced this capability with Vista, but your device has to support their in-box class drivers which take advantage of the SysFX DSP features. If you don't use in-box class drivers and your audio drivers don't include any bass management capabilities, you may want to download the Channel Mixer plugin for foobar2000. The author of the Channel Mixer plugin also created the Matrix Mixer, which might eventually provide more flexibility.

Since I have a big media server, which I use to store all my ripped music and videos, I prefer to do the same with the tracks from my DVD-As. I don't think it is possible to save the tracks as individual MLP files. So I'd like to rip the MLP tracks into individual multichannel FLAC (free lossless audio codec) files. Since FLAC is also lossless, these will be virtually identical to the MLP and almost every player supports FLAC. Converting to FLAC is very easy with the DVD-Audio Decoder plugin and a standard converter component that ships with foobar2000. The converter component is used to convert (or transcode) from one audio format to another. Even though foobar2000 natively supports FLAC, you will need the FLAC command line tool for this to work with the foobar2000 converter. I just downloaded the latest 'exe' that was available and ran the installation routine. All you really need are the core tools, but it won't hurt to include the FLAC Frontend and FLAC Tester. I did not include the source code for my installation. By default, it will create a subfolder in your 'Program Files' folder and install all the files you need. Now you should be ready to rip the DVD-A MLP tracks into FLAC files. Here's what you do:

In foobar2000, select all the tracks you want to convert to FLAC. In my case, I'm only converting the multichannel tracks. As you can see, I already edited the track info for my album.

Move your mouse over any of the highlighted tracks and right click. From the menu pick Convert. This will activate the Converter Setup:

In the setup dialog set the output format to FLAC. You can adjust the FLAC level by clicking on the '...' button. The larger the level, the tighter the lossless compression resulting in a smaller file. This also takes longer to generate because of the additional calculations. I just used the default level 5. For now I'm just going to rip these tracks to a folder on my Desktop. I'll move them to my media server later. In the 'Output files' section I selected 'Convert each track to an individual file' and created a naming format of '%track%-%title%'. The preview box on the right shows how each file will be named. I'm going to accept the defaults for everything else and pick 'OK' to start ripping.

The first time you do this, the converter will ask for the location of FLAC command line encoder. Navigate to where you just installed the FLAC stuff (in my case it is 'C:\Program Files (x86)\FLAC') and select the flac.exe file and pick 'Open'.


Now it should start converting the MLP tracks into FLAC files.

That's it!

Wednesday, December 09, 2009

Nine Inch Nails - The Slip

More free stuff. At this nin.com link you can sign up and receive a download link for a free copy of the new Nine Inch Nails album "The Slip." The album is available in a variety of formats including 24-bit/96Khz WAV.

Tuesday, December 08, 2009

And More HiRez Downloads

This time the samples are from HDTT - High Definition Tape Transfers. They offer some 24-bit/192KHz tracks that are encoded using lossless FLAC. Here's what they say on their website:

High Definition Tape Transfers specializes in rare classical recordings mastered with the best mastering equipment available. They are available in Redbook CD, 24/96 DVD and HQCD. We also offer our releases in 24/96 and 24/192 (on select titles) Flac downloads for playback on a High End Computer Audio System.

They have a list of 5 sample tracks available for download on their storefront. Check it out.

Thursday, December 03, 2009

More HiRez Audio Downloads

Every now and then I get notices for sample tracks of some high resolution audio. I've posted information about both of these sources before, so some of you may have received the same offers.

The first is Linn Records. On their website they have an article titled, "What is a Studio Master?" It explains how analog recordings on vinyl or magnetic tape sounded better than CDs because of the analog to digital process that chopped up the perfect waveform into little bits. They oversimplify things and fail to mention the problems when reproducing sound with a needle vibrating inside the groove of a rotating vinyl platter. Anyhow, I don't want to start a big debate over analog vs. digital or vinyl vs. optical disc. I have a pretty good Linn Sondek LP12 turntable that I haven't used for years. I prefer the quality and convenience of playing digital files from my media server to several computer systems, which are connected to my stereo and home theater gear. They go on to tell us that their Studio Master files are much higher resolution than CDs and sound as good as analogue. I would say they sound better than what you will hear from vinyl or magnetic tape. At the end of the article they provide a link to some sample files. I encourage you to download these and have a listen. Obviously, you'll need equipment capable of handling these files. BTW, the article mentions that Studio Master files are encoded at 24-bit or higher and up to 192 KHz. These samples are actually 24-bit/88KHz.

The other source for high resolution audio samples is 2L, the Norwegian music label. They have a few tracks in a variety of file formats and resolutions. They also let you choose both stereo and surround versions.

Wednesday, January 07, 2009

Pioneer subsidiary TAD demos HD Audio at CES '09

Sheffield Labs recording legends Bill Schnee and Doug Sax will be demonstrating 24bit/192KHz audio recorded on Blu-ray discs at CES '09 this week. These recordings are suppose to appeal to audiophiles that want better quality audio than CDs or MP3s (duh!!). I'm not sure what they mean by "giving consumers an unprecedented opportunity to experience digital music that rivals 2-channel analog sound," but I'm guessing they are referring to vinyl and/or reel-to-reel tape, which technically, CD already achieves. Yah, yah, I know vinyl has a better frequency response if you can ignore the noise floor, but you need pretty high end turn tables, cartridges, etc. to achieve this.

I'm not sure if this will be an improvement over DVD-A and SACD, but since those disc formats failed, it's worth trying again. It looks like they will be using a music-only format which utilizes Blu-ray disc technology.

Since I don't have any plans to purchase a Blu-ray player, this doesn't really appeal to me. Personally, I prefer just downloading the high res audio from an online music store and storing them on our media server. All my physical discs are stored away in a closet.

Eventually, I plan to purchase a Blu-ray drive for my HTPC and then I'd like to give these a listen. I'd still want to rip the tracks to the server and use my music library software for playing from my PCs.

For more info, click on this article's title and it will take you to the press release.

BTW, I decided not to go to CES this year. Lots of reasons... the economy, tired of big trade shows, better ways to spend the money, etc., etc.

Tuesday, December 02, 2008

It's Been Awhile... Problems Playing Blu-ray.

For those of you who may actually read this blog, I apologize for not writing anything since June. I'm still around and hope to start posting more frequently.

We haven't made much progress lately with our product development. There are a couple of big hurdles, which we don't have a lot of control over that have slowed us down.

One of the issues that we have to deal with is multichannel audio playback of Blu-ray movies. Our product should be a pretty good match for the HD audio codecs, like DTS-HD Master Audio and Dolby TrueHD. Both provide lossless encoding of up to 8 channels of audio with a bitdepth of 24 bit and up to 192 KHz sample rate. The highest resolution will probably be 24/96 most of the time and many titles might be 24/48. With such high resolution it seems a shame to play this quality of audio with just a basic audio/video receiver. I think you'd want really high quality DACs and powerful, low distortion amps to play back this HD audio in its full glory. That's one of the reasons we think our product is a good fit for HD audio. We plan to include the highest quality DACs and amplifiers.

So here's our problem. Since our product is meant to be connected to your HTPC and will perform the duties of your soundcard, it is dependent on the movie playback software for decoding the audio streams. Currently, the most popular software for Blu-ray playback is Cyberlink's PowerDVD Ultra, ArcSoft's TotalMedia Theater, Corel's WinDVD 9 and Nero's Nero 8 Ultimate. From what I understand, none of these programs will let you play DTS-HD Master Audio or Dolby TrueHD without downsampling, unless your hardware supports a protected audio path (PAP). Basically to play Blu-ray movies with AACS copy protection using an HTPC, the hardware must have a PAP to play the original HD audio if the bitdepth and sample rate are more than 16 bit and 48 KHz. Without PAP, the HD audio has to be downsampled to 16 bit/48 KHz as per the AACS specification. The basic audio path starts with the software player, which decodes the audio from either the encoded DTS-HD Master Audio or Dolby TrueHD into multichannel LPCM (linear pulse code modulated) data. Next, the LPCM is transmitted to the DACs, which convert the LPCM digital data into analog waveforms. Finally, the analog waveforms are amplified and output to your speakers. So, the reason for AACS and the PAP is to prevent people from getting the digital data and making perfect copies of the original HD audio. The critical part of the audio path that needs to be protected is between the software player's output of LPCM and the DACs. Unfortunately, there's no hardware standard for PAP that can be used with any hardware device. You have to develop your own proprietary hardware/driver solution and get each of the software players to support it. Unfortunately, there's no industry group working on a standard either. Maybe Microsoft will provide some support and guidance with Windows 7, but I haven't read anything that gives me hope. Actually, I'd be surprised if Microsoft came up with a good solution since it seems they're not too motivated to support Blu-ray in any way. So, to say the least, I'm a little pessimistic about PAP and HD audio playback with Blu-ray movies. There are some workarounds, but it's a PITA. You can use AnyDVD HD to decrypt the Blu-ray disc, then you split the audio and video into different files, convert the lossless HD audio track into a multichannel lossless audio format like WMA lossless or FLAC, and then recombine the audio and video into a MKV file and play it back with something like Media Player Classic. Like I said, it's a pain in the ass. You also lose all the extras.

The thing that really bugs me about this is all the encrypted formats used in Blu-ray have been cracked. So the pirates have no problems getting the unencryped stream from a Blu-ray disc. Legimate owners of Blu-ray discs can't play the full resolution HD audio, but pirates can still copy it. Hopefully, the current trend toward DRM free music will carry over into the movie industry and they'll relax the PAP requirements in the future. Maybe they'll be more open to this if Blu-ray player and disc sales don't increase during this holiday season.

Friday, June 13, 2008

HDtracks - Another Music Store with High Quality Downloads

We can now add HDtracks to our list of online music stores that offer true CD quality tracks and albums. I just discovered them a few days ago and they offer music from a wide variety of independent labels. There's an impressive list of artists, including Buddy Guy, Albert Collins, Muddy Waters, John Prine, Aaron Neville, Rahsaan Roland Kirk, Jean-Luc Ponty, Gary Burton, Norah Jones, Chuck Mangione, Patricia Barber, Judy Collins, Joan Baez, Robin Holcomb, and on and on...

You have a choice of these download file formats (in decreasing file size order) - AIFF, FLAC and 320 Kbps MP3s. And this is something the other music stores should also provide - they include a very nice PDF file with all the cover art and liner notes. Oh, and of course, all the tracks are DRM free. In the near future they will offer select tracks in high resolution 24bit/96KHz formats. Hopefully, this will include some surround recordings.

HDtracks was founded by David and Norman Chesky of the audiophile record label Chesky Records. On their 'About' page they state: "In an age when there is a computer in every home, we have grown accustomed to accessing music at the touch of a button. But, what about the quality of that music? Why should the sound suffer because of convenience? With HDtracks, we have discovered the way to have it all: world-class music, unrivaled sound, and files that play in any environment."

They have a free sampler album (there's a link on the front page of their website), so I decided to test out their download process. After registering (don't worry, it's painless), you get an email that includes a link to the freebie. I can't remember all the details because it was a few days ago, but once I clicked on the link and followed the instructions, a little download program (Java applet) started and displayed the default settings for destination folders, etc., and provided a big button to start the download. Each track was listed and a progress bar indicated that the downloads were very quick. This was for the FLAC files. Overall, I was pretty impressed. HDtracks seems to have done it right, a great selection of music and their download process was very quick and easy.
Powered By Blogger